
Jewellery Box Repaint! Lilo and Stitch!
By Natalie Wyatt

Aloha!
This past week, I have been super busy doing the biggest clean up of my room. I decided it was about time...
It was been really rewarding! Everything is beautiful again and clutter free! And no more spiders under my bed... *shiver*. Plus I found $80 and an $150 gift voucher!
Anyway! I have had this Jewellery box for a while now and it was looking a bit old and dated, so I had thrown it in the pile to give away, but then I looked at it through DIY eyes and saw an opportunity! So I've created his little tutorial on how I re-painted my jewellery box!

Materials:
- Gesso (Or an alternative primer)
- Schmincke Aerocolors: 101, 202, 304, 405, 602, 701.
- Craft Glue
- Nice Pattern Paper (To line the bottom)
- Tape
- Scissors
- Glitter
- Pencil
- Rubber
- Paintbrushes
- Glass of Water
- Scrap Paper
- Palette for Blending


So I gave my jewellery box a good clean so it was ready to be painted. I used some scrap paper underneath to protect the desk.

I used the masking tape to tape the edges of the mirror, to prevent paint getting on the mirror.

I applied my first coat of Gesso to the top and edges of the jewellery box.

I also pulled out the bottom drawer to paint. (I didn't paint the back edge because you won't see that once the drawer is back in place). While resting them, I placed them on top of small blocks to stop the paint sticking to the paper.

When the first coat was dry, I applied a second (lighter coat) and left it overnight to dry fully. In the morning I then put the drawer back into the jewellery box.

The beauty of gesso paint is it dries fairly quickly and is able to be drawn on and even worked on with an eraser.

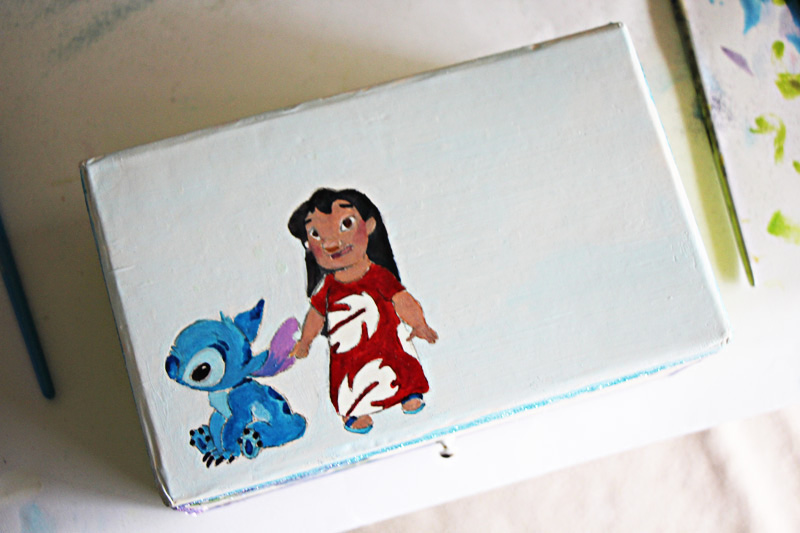
I first started by drawing out a sketch of Stitch.

I then added Lilo. These were freehand drawn.

And then of course, I added Ohana to the front edge because that's pretty much the whole movie theme!

I used the Aerocolor paints to decorate my jewellery box. I got these in a set, the Roland Kuck Fantasy set. The codes from left to right: 405, 202, 304, 101, 701, 602.

And then of course, my trusty steeds.

I used this plastic palette to mix my colours. The Aero Colors come with very handy eye dropper tool applicators, which mean that you don't waste your paint!

I painted my first layer on Stitch, I used the Blue and White to create these colours.

Adding some more details.

I used the Black for the eyes and then the ear were varying combinations of the Blue, Pink and White.

The skin colour was tricky, but I used a small amount of the Pink, Yellow, White and a dash of Blue. The photo's make the paint look grainier than they did in reality.

For the dress, I used Pink and Yellow.
For the cheeks and mouth, I used the Pink and White.
For the hair, I used the Black.
And Blue and White on the feet.

I used the plain blue for the writing.
I laden my brush rather heavily so I could get the light and shade in the writing.

Ohana!
TIP: When using your pencil, use a light shade like 2H, (unlike what I used in this tutorial) this will stop the paint from mixing with the lead and becoming dirty.

Flower with a Blue and White base.

Added some darker blue, with a hint of Pink.

Glitter time! I shook the packets of glitter over the wet painted areas and sometimes, used a dry paint brush to apply. Try and apply the glitter while the paint is wet.

Wasn't liking how this flower was going, but glitter solves everything! Made some Purple paint with the Blue, White and Pink

Added in the leaves.

Outlined the flower and added some Yellow to the leaves.

I made this Green with Yellow and a touch of Blue.

You can't see very well here, but I added some green glitter over the paint.

And repeated around the other sides of the box.

I then painted a Light Blue colour from the Blue and White and added some blue glitter! I followed this around the whole box.

Added a Purple strip around the front of the box.
I then painted a very light Bluish White to the top of the box. I used a very fine brush to paint around Lilo and Stitch.

I had painted Gesso on the edges of the mirror and now I painted it Purple. This was a mix of Blue, Pink and White.

I then took away the sticky tape. (Just be careful what tape you use, because you might be left with sticky marks). Which you can clean off with Eucalyptus oil.

I cut out a piece of sparkly paper to stick to the bottom of my jewellery box.


I used Craft glue, which I bought from Spotlight.

Ta-da! It covered up some yucky marks, which was great!


I then used a fine-liner pen to add details to Lilo and Stitch.

Finito!


It sparkles very nicely in real life!
~
Find us on Facebook:
Instagram: @mepxymarkers
_________________________
Please send us your work or anything that you create! Thanks for watching!

Natalie Wyatt

Instagram: @artbynataliebeth
What a cool idea! :)
ReplyDelete