Tuesday 31 March 2015

Book Loves and Tea


Last week we rescued an unloved teapot and this week we are making over a plain old white teacup.
Using almost exact the same supplies!

Supplies Needed
1 white teacup
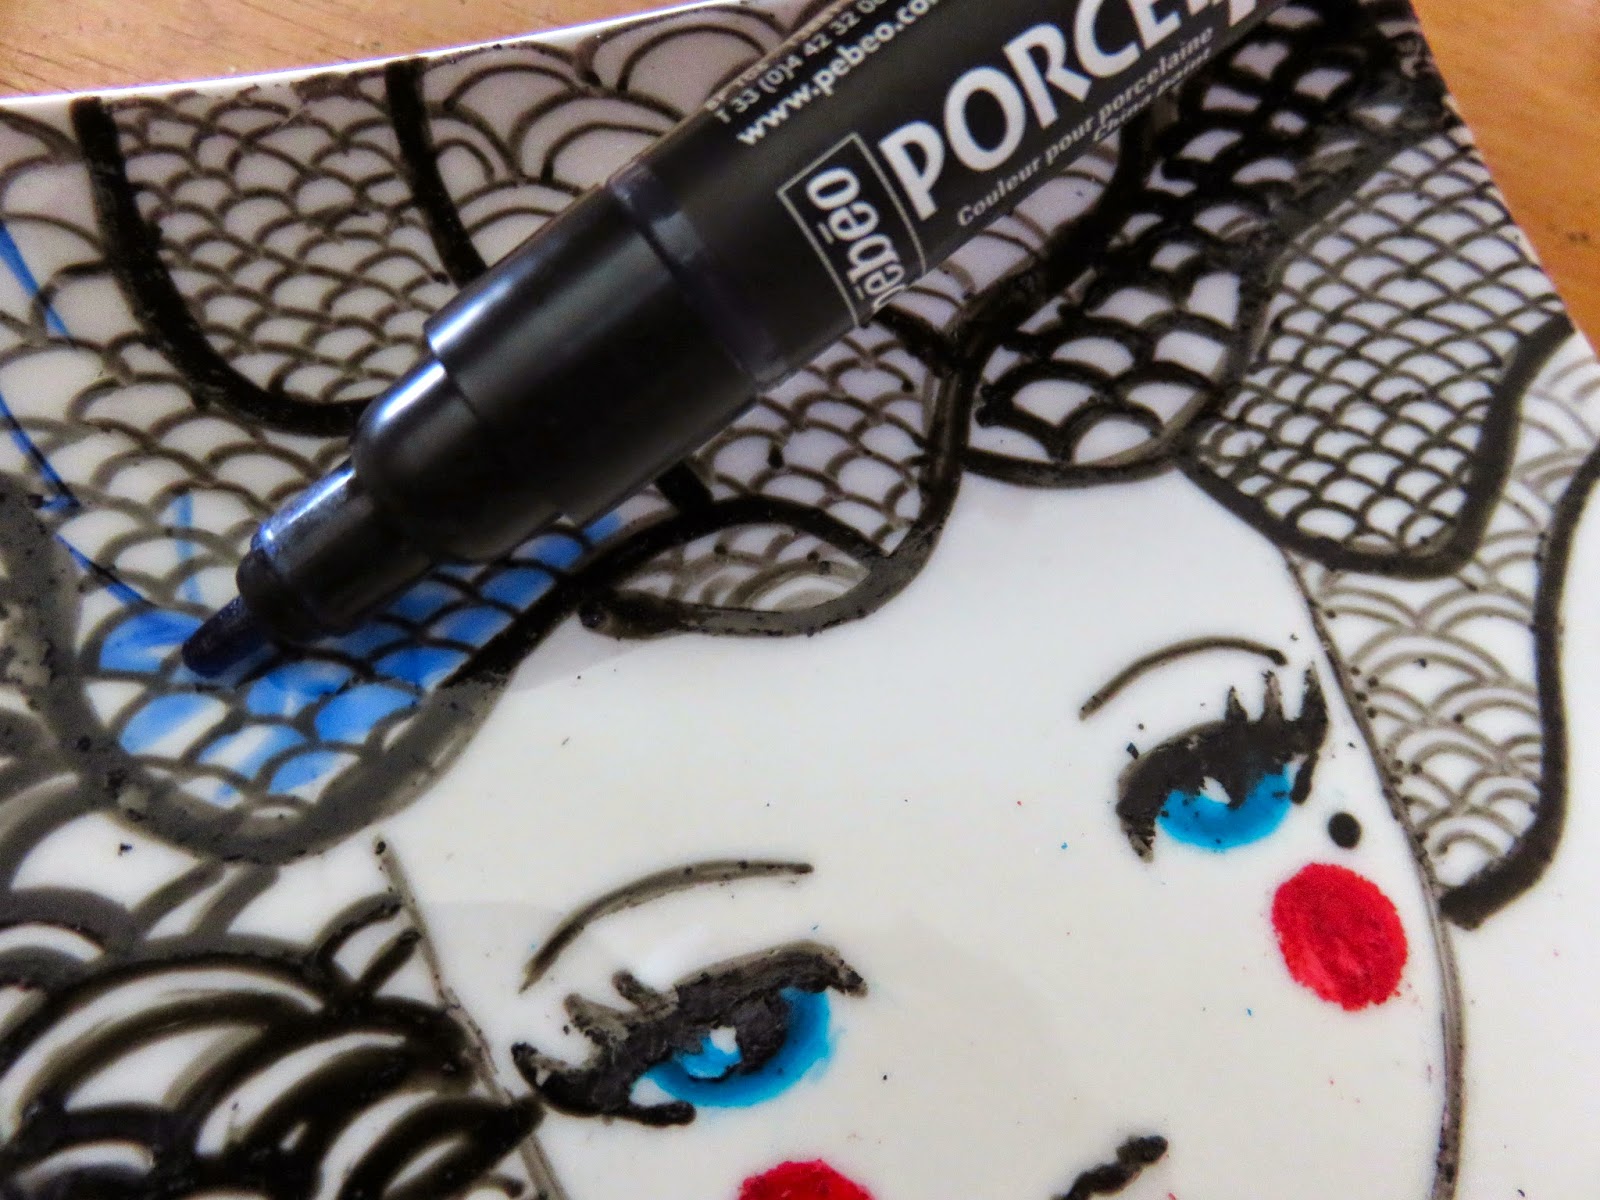
1 set of Pebeo Porcelain 150 Markers
Cotton Buds
Rubbing alcohol (for cleaning up mistakes and edges)

I am a huge book lover, and wanted to mix my love for books and my love for tea to create a project that doesn't require too much artistic flare.

I decided I wanted to create a bookshelf covered with piles of books odds and ends all around the teacup.
I started by drawing out what I wanted onto a sheet of paper for reference.


Sketching your ideas out on paper makes it a little less daunting when it comes to drawing it onto your teacup, and if you are still worried, you can use a lead pencil to sketch onto you teacup, I skipped this step and went straight in with the markers.


I used the black pen to do my initial outlines of the books and items, then left it overnight to dry, then went back in and added accent colours. They are simple drawings but look effective on the white background.
I went in with cotton buds dipped in rubbing alcohol to smooth out lines or erase things I didn't like.
Once I was happen with my teacup I gave it the full 24 hours to cure, then popped it in the oven. 150 degrees for 50 mins. After the 50 mins, is up I turned the oven off and left the door open to let it cool fully before removing it.

What you are left with, is a super adorable book lovers teacup.


Next week I shall be delving into markers and inks! to help create some mail art!
Enjoy creating bookish teacups
x Courtney

Monday 30 March 2015

Personalised Pebeo Mugs For Easter

Today I've been having a blast creating hand-painted personalised mugs for my nieces and nephews. I am going to fill then with chocolate eggs for easter, but this would be a simple and fun idea to make a personalised gift for any occasion - and it's practical!

Personalised Mugs
All you need are some plain undecorated mugs which you can pick up pretty cheap at discount stores, and a selection of Pebeo 150 Porcelain Paints. The Pebeo Porcelain 150 Markers and Outliners are handy too.

The sky is the limit with what you can create, but if you are new to this or feel you aren't very "arty", here are some tips:

  • Use colours in the similar colours to the actual colour of your mug.
  • The brush strokes really show up with these paints - and they take long enough to dry that you have a bit of time to play, so use this to your advantage and try different size brushes and strokes - stripes, swirls, circles etc.
  • With your designs keep them simple and organic as it can be difficult to keep control of what you are doing on a curved surface like a mug - they will still look effective!
Below is a short video showing me painting on of the mugs. I hope you find it inspiring and have fun creating your own personalised gifts with Pebeo Porcelaine 150 paints.


Pebeo paint with Felicity


Hello, Felicity here today.

I have been playing in my art journal again this time experimenting with some Pebeo paint. These paints are mainly used for fabric or porcelain.
This time what I did was layer my watercolour paper first with Gesso. Then I used a spatula and layer my colours on. Of course I didn't wait for Gesso to try, who has time for that... Tee hee. Because the gesso was still wet, it allowed these paint colours to be 'toned' down.


I then used some black Alcohol ink and put a stripe at the top and then tipped my book up so that the ink would drip.

I did then wait for all this try. Then I used a stencil/mask and a sponge and put some circles on the page. As you can see, same colours but darker, that because there was no wet gesso.
Once these dried I grabbed a nappy wipe and rubbed the circles, removing some paint so that it would leave some 'white worn' patches.

To finish off I doodled around some circles, added some stamping and a title.


Material list: Pebeo lightgreen, Parma Violet, Azure, Alcohol ink black, Watercolour paper.

Its amazing what you can do with products that aren't necessarily made for paper.
After all aren't Art rules there to be broken?? Tee hee


Happy painting! :)
Felicity! XO

Sunday 29 March 2015

My son loves my Pebeo Fabric Paints now!!!

My son wanted his name Printed on His SAPSASA Jacket. You can get this done onsite at the events but its a bit expensive and you have to wait in line. Once I got my Pebeo Setacolor fabric paints I thought I could maybe give it a go myself with some of my lettering stamps.
It worked a treat.  The Fabric paint stamps really well, you can put whatever wherever you want. Its so cool, I cant wait now to try more stamping on fabric.


  Check out How to Personalise a School or Sport Top by Siann Watts on Snapguide.

Friday 27 March 2015

Pretty Platters

Pretty Platters with Pèbèo Porcelain  150


I know that's a tongue twister, Try saying it 5 times quickly.
Seriously though, I loved creating these and I cans see that the options are endless. 

To create your own pretty platters to impress you friends you'll need…

Porcelain dishes of choice
Pèbèo Porcelaine 150 markers
Pebeo fine point black (0.7mm)paint pen
regular 6B pencil
Porcelaine 150 Brilliant paint in Scarlet and White
Sharp object to remove and sharpen lines
paintbrush
Rubbing alcohol and cotton buds

So lets get started


I drew a face on the platter freehand. It's so easy to wipe off and correct if you aren't happy with it. When you have the look you want, begin outlining with the black porcelain paint pens in the 1.2mm and 0.7mm 


Decide how you want to create the 'hair'. My first design kind of set the tone for the organic look.Adding random lines in various thicknesses, I created 'branches' and then dots to add a kind of shadow. The eyes are simply a dab of Peacock Blue and the lips and cheeks are scarlet red.


Add the Peacock blue to the top of the colour area and blend out with your fingers.


Starting with Earth Brown at the base and blend with your fingers. Go lighter as you move up. I used Marseille Yellow,, Agate Orange and Peridot Green blending colours as you work.


Finally, a touch of Peacock blue added to the top and some of the golds at the bottom help balance the look.  
Allow the paints 24 hours drying time before baking in your oven for around 35 min at 150ºC

Now you are free to create your set of platters. 
I did sharpen the lines up and added the highlight in the eyes by 'scratching' off any untidy or messy lines. A wooden skewer of sharpish tool will work. A quick sip over with some rubbing alcohol with a tissue or a cotton bud does the job of cleaning up.


Heres a quick glimpse of some of the other platter designs. 
I did use the Porcelaine 150 paints from the little jars in these.  Mixing a little Scarlet red and white to get the varied pinks for the floral hair. 
After adding a Peacock blue base, I softened it off by dabbing some watered down White. 
Keep playing till you're happy. And most importantly, have fun with it. 


 Now you're set to impress.

Time to invite you friends around for a cuppa and serve them their favourite treat on what is sure to be the talking point of your get together.Your personalised platters. 

Enjoy
Cheers
xox
Kerry Sinigaglia

Thursday 26 March 2015

Create an Easy Peasy Abstract Design With Pebeo Porcelaine 150

Abstract Pot.
Today I've been playing with Pebeo Porcelaine 150 paints and markers. To get used to this medium and get an idea for how it works I've created a fun, simple abstract design on a small ceramic pot. If you are looking for design inspiration watch the video below and follow along, or simply use it to get your own ideas.

Here are the materials you will need to create a pot similar to the above:

  • Pebeo Porcelaine 150 Paint in Olivine Green (Glossy)
  • Pebeo Porcelaine 150 Paint in Lapis Blue (Glossy)
  • Pebeo Porcelaine 150 Outliner Black
  • Pebeo Porcelaine 150 Markers in Anthracite Black, Peridot Green, Peacock Blue and Amazonite Green
  • Flat brushes in different sizes
  • Ceramic pot, plate or other...


Don't forget once you've finished project let it dry for 24 hours, then bake in a domestic oven for 35 minutes at 150C (300F) as per instructions on the product.

Wednesday 25 March 2015

Fingerpainting with class - Save a Teapot.


I must admit, I've had a love hate relationship with the glass and porcelain paints, trying to bend them to my will, sometimes working with my cake dish and sometimes not...(with projects now in the bin) but one thing I never tried with these paints...it just using my fingers.

Going at it like a little kid, and just fingerpainting. We all did it, once upon a time, took to paint with wild abandon and I decided to today I was going to do the same.

Today we are turning a $1.00 op shop teapot into something a little more inviting!
Today we are using the following supplies
An Op Shop unloved teapot.
1. Paintbrush (which I barely used)
2. Plastic palette to mix colours.
3. The Pebeo Porcelaine 150 paint pots in various colours.
4. Black Pebeo Porcelaine markers for little bit of outlines
4 Your Fingers!

I love messy flowers, they are fuss free and anyone can create messy painterly looking flowers with not much effort at all!

First you want to get your red out  two blobs, one for pure red, and one for mixing with white to get depth into you flowers.
After having a lot of issues with paintbrushes, this is where my idea for finger painting came from!

I created one big red flower on one side of the teapot and two smaller flowers, this was just creating the general shape of a poppy, I did say fuss free its easy to make these look more involved then they are. I got so involved and excited about the flowers there was no images of this! I forgot I was making this for others!

 I mixed some red and blue together on the side to make a dark purple almost black, and just dabbed it into the center on each flower.


 Its a little messy but its total fun!


I then wanted to make some messy looking foliage so I grabbed the green pot, and added some white to lighten it up, I added pure green, and lightened green to create 'leaf like shapes' see you don't need to be an artist to make this teapot look cute.


I had the two separate greens on two fingers and just added them interchangeably. 
Just pop the greens in the places around the red flowers, lights and darks and before you know it you have a painterly looking poppie posie.

I then waited  a night for one side to dry, then started the second side, as I needed to lie it down so gravity didn't take my flowers to the bottom of the pot.

I also wanted to give the spout and handle some flare, so I created a striped handle, just a tip, if you want a very opaque black, you will need to apply the black in layers, it took me many layers of black to get it opaque to my liking.
as you can see in this terribly lit image (I was working at night) this was two layers, it took 7 layers of black to get it the way the finish look.

In the end I ditched the brush and started applying the black with my fingers to get a thicker layer of black.
I added little white highlights to the center of the flowers, and little black outlines around some of the leaves to give depth.

Once you are happy with your teapot, give it a full 24 hours to cure before you put it in the oven.
150 degrees for 50 mins. After the 50 mins, is up I turned the oven off and left the door open to let it cool fully before removing it.

And then the finished product looks a little something like this!

 It may not be designer, but its handmade and imperfect and I'm in love with it!


So go save a teapot from an op-shop and give it another life. Its a lovely weekend project, and leaves you with something that no one else will have! also makes a very cute house warming gift for loved ones.
Stay tuned for another project I have installed next week for the book lovers.

Courtney Diaz

Monday 23 March 2015

Mepxy Max 4th Edition

MEPXY MAX 4TH EDITION

Fist Bump BAYMAX!

BY Ash Chain
Created with Canson Drawing 220 paper and Mepxy Markers


Good evening one and all! Here's yet another Mepxy Max break down! Today I used the Mepxy brush markers and Canson 220 drawing paper. This is a step by step picture tutorial so you can see the whole stage of colouring although this now was only small and quick you can still enjoy it and hopefully take something away from it. I LOVE DISNEY AND MARVEL. I we were lucky enough that they collaborated and created BIG HERO 6! I loved this movie so much and watch it often enough to know every line. I hope you've seen it and loved it too and hope you enjoy this piece too. I LOVE BAYMAX!


I usually start with the small stuff and work may way through the the bigger areas. I find this get you into a groove with using your markers.


As you can see from the above image, if i'm using a few of the same pieces (the blossoms) I will make sure that at least one of them is a slightly different colour to the rest. This creates a good contrasting effect.


Again, contrast! In certain pieces I like to do this where as in others I like things to be a bit more blended.


I love using a least three different colour when doing leaves! I add leaves to almost everything I draw.


Now when it does come to reds I try and stay as close to matching colours as possible because one red can look more orange than the other or more pink rather than the desired red you're after. I tend to do layers of reds until I'm satisfied with the colour it have become.


Cool Greys! How I love thee! you can get such contrast with this set! I highly recommend testing these out first as some greys can look a little more brownish.


BALALALALA!
There you have it! A Baymax fist bump! I hope you're all satisfied with your care... err I mean the tutorial!

Colours I used were:
L24, L25, L67, W00, R00, R02, R20, R32, R29, R08, R09, Y38, Y08, P04, N01, N51, P04, 00