Thursday 29 January 2015

Coloured Chaos Glasses

Coloured Chaos Glasses
By Natalie Wyatt 

Made with "Pebeo Vitrea 160 Glass Paint".

This glass is an extremely easy design and a great expression of your flair as no two could be alike. It can also be done in less than five minutes. (Excluding baking)

 What you will need:

  • 1 x Packet of Pebeo Vitrea 160 Glass Paints (Glossy)
  • 1 x Wales Old Fashion Glass (Or any other preference)*
  • 1 x Small Paintbrush (I used Princeton Art & Brush Co. Golden Taklon Synthetic Hair #4 Round)
  • 1 x Spatula (I used Catalyst by Princeton)
  • A cup filled with water (To rise your brush)
  • Scrap paper to cover work-bench.
  • Tissues to blot the wet paint-brushes.
* I bought my glasses from Kmart, they came as a pack of 6 and were $6!

 I used Pepper Red, Sun Yellow and Turquoise Vitrea 160 paints for this example. You may use other colours as desired, however the three selected colours are the basic Primary colours which mix to make all other secondary colours like green, orange and purple.

 First begin by dipping your paintbrush into the paints and loading it rather heavily onto the glass in a small line. Make sure you wash in the cup of water and dry your brush on the tissues between each colour so you don't mix the paints in the pots.

 Then, using the spatula tip, drag the spatula across the lines starting at the red and smoothing past the blue to create a stroke of mixed colour.

 You will then notice on your spatula residue from the smudged paint. Do not wash this off!

Using the side of the spatula with paint, again swipe the spatula across the glass in a different direction. This will create a new colour stroke.

 Repeat the same process in different areas until you have run out of paint on the spatula. You may like to smudge the paint already on the glass to create new strokes.

 Repeat the first steps again by applying the three colours using the paintbrush onto the glass. You don't have to necessarily use lines or have any sort of order! All we want is the colours to be close enough to blend. For example, in the above shot, I used dots of paint as well as lines.

 Take the spatula again and smudge the paint to create the colour strokes on the glass. 
I painted my glass in an ascending fashion so the colour would start at the bottom of the glass and wrap around to the top.

 Now finally when you are happy with your design, put it aside and allow to dry. 
The instructions say to leave it for 12 hours, but if you have only a thin layer of paint you might only need a couple of hours. I generally just do a touch test, if it's dry and your finger comes away clean then it's ready.

 You can now place it on a tray and bake it in a conventional oven on 160 degrees for 40 minutes. (Normal oven function is fine)
Then remove your glass from the tray and allow to cool.
The baking process deepens the colours and helps them set so your glass is now ready to use and is dishwasher and microwave safe!

If you find you have some dried on paint on your desk or any surface, just scratch it off and it should leave your surface clean. Same with skin, you can either wash it off immediately, or wait for it to dry and just peel/scratch it off.


The glasses look brilliant in sunlight and create an almost stained glass effect!

Please send us photos of your designs!

Natalie Wyatt


Natalie's Facebook Page: https://www.facebook.com/nataliebethart?pnref=lhc

Friday 16 January 2015

Meet Naomi Cox......

Meet Naomi Cox.


Hey you

I am so excited to be a part of the Crafty crusaders and can not believe I am amongst such an amazing clan of creative types considering I am a stay at home mum to three of my greatest masterpieces in the outer eastern suburbs of Melbourne.

For as long as I can remember I have painted and drawn and created my own little characters and adventures and journaled day to day life in a format that resembled what I now know as Scrapbooking. As a self taught artist I dabble and learn through experiments and accidents and love to share my successes and my failures on the art front...I believe it is all part of the process, and each time you will learn a little bit more about yourself in the process.

I don't have a favourite medium or style I love it all.... You think I am kidding but seriously I am not  As a 'Jill of all trades and master of none' I have a whole studio filled with loved tools and half finished projects...I paint in watercolours, oils and acrylics. I draw in pencil, biro and ink. I make cards, scrapbook and do mixed media. I can make jewellery, bead and sew knit and am learning to crochet....I am pretty sure if there is a hobby out there I have given it a red hot crack

So here is a little glimpse of what I do when I am not being a mum.....

Twisted fairytales Collection
Acrylic/mixed media on Canson Art board


Growing wings
prismacolour / acrylic on watercolour paper


Candy skull
Mixed media on Canson Art board


Art journal pages
Mixed media


Scrapbooking


Original illustrations of 
Mimi and Cordstar


I believe in essence I am a 'Craftivist' - I love everything about the process of creating and I hope you enjoy the ride with me... 

Cheers Nx


Thursday 15 January 2015

Meet Ash Chain


Hey ladies, my name is Ash Chain and I'm a 24 year old tattoo artist and cosplayer currently living in Cairns. I have been tattooing for the past three years and cosplaying for seven years. I have also been creating art using different mediums since my early high school years. I have been a gamer  and an avid comic, memorabilia and statue collector for the majority of my life. Comic book artists such as Jim Lee and Nichola Scott have been a major influence and inspiration to my art work and drawing style. Simple yet full of impact. Although i mainly draw animals and objects so David Attenborough and the animal kingdom are my major influences there. I love animals and have watch David Attenborough since I can remember. I drawing mainly in pen and ink. I also use pencil, paint, watercolour and even digital. I travel around Australia attending tattoo conventions and also pop culture conventions such as Supanova and Comic Con advertising myself as a professional tattoo artist, artist and skills in fabrication as a cosplayer. I never travel without my trusty mepxy markers and a pad of paper. After all you never know when inspiration will strike. Hope you enjoy my work.


One of my first times using Mepxy markers. Decided and vibrant fennec fox would be perfect.


Superman mixing his reds with the white washing load. We've all done it.


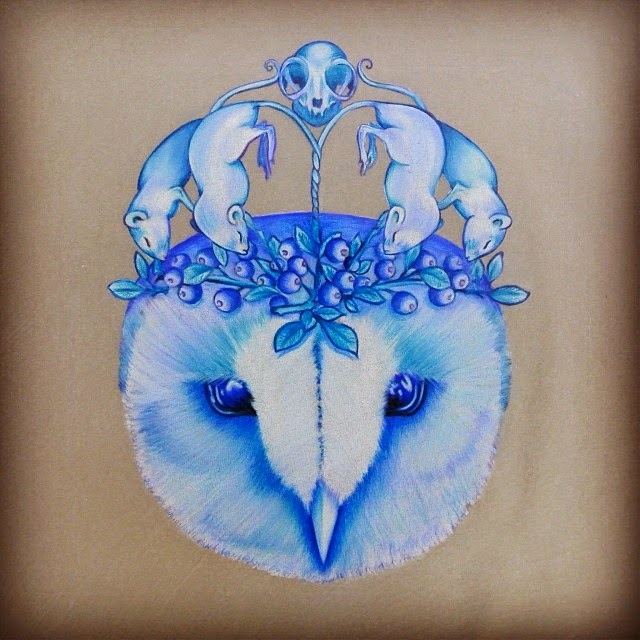
King of the Owls with his sloe berry and dead mice crown. Pencil work.


(Not finished) Oil on canvas. The Magnificent Bird of Paradise.


I love foxes and I love flowers. A3 Canson 220 drawing paper with Mepxy markers.


Even assassins need their coffee break. This piece was recognised and praised by two of the artists that worked on Etzio in the first assassin's creed. Needless to say I was a bit stoked!


I love cats. I love Assassin's Creed. This is the result.

Hope you've enjoyed some of my art!


Wednesday 14 January 2015

Meet Siann Watts......

Greetings All!


I live on a farm in country South Australia with my three precious children and wonderful husband. 
I have enjoyed anything remotely arty or crafty for as long as I can remember. 
I have a Bachelor of Design (majoring in illustration) and a Bachelor of Education. 
I've taught Art, Design and Photography at High School level. 
I entered the Scrap booking world when my children were young and have loved it ever since. 
I want to try every crafty/arty thing I see, and wish there was more time to create in each day. 
I am still filled with wonder at what one can bring to life with a blank canvas and some paint, pencils, paper etc. 

It fills me with excitement each and every time!


Here is a brief sample of my Work:

                                                           
                                                  acrylic, currently on my wall (hence all the reflections)


                      acrylic on canvas  1mtr wide
                                            
                                            Mixed Media
                         
                              Scrap booking


                                           Prisma Pencil

                                      watercolour and Prisma pencil


Lovely to meet you,  I am looking forward to this Journey with you all!

Siann


Tuesday 13 January 2015

A family Tree.

Hi there.
Welcome to The Crafty Crusaders Blog today.

I have a Project to share here this morning.


                                                                                                                                                                                                             Family Tree Tutorial - how to make your family tree craft with MS Word Art
                                                                                    
                                                         Image Source 


I created my version from an image I saw on Pinterest created in Microsoft Word.

I thought it was really sweet, and wondered if I could create something like it for My Step Dad's 70th birthday.  

I got out my treasured Canson A3 Watercolour Pad.  Its a lovely 300gsm, which makes it sturdy and resiliant.

I LOVE the Schmincke Aerocolor Inks, and they played very nicely with my dip pen.  I used two colours but they are not really distinguishable with fine lines.


I used the Pebeo Watercolour set.  They are lovely.


First I roughly drew a border around my page in light pencil, just to keep my image in the centre, with a clear space around the edge.

I lightly sketched out the shape of a tree with some branches, and then added the names of the children on each, the stems being the grandies, the tree trunk are the parents of our blended family....  The ground area are the Grandparents. 


I added painted leaves, and then added rough details with graphite pencil.


I framed it with a simple white frame, and H
he loved it!

Might have to do one for myself, now.  It was really quick to do.  (Literally took me an hour!)

Thanks for stopping by the blog today.  See you again soon!