Showing posts with label fabric. Show all posts

Sunday, 12 July 2015

100 Circles in 100 days project

Hello it's Peta here again on the blog today.

As part of my study into art therapy I have embarked on a project to create 100 circles in 100 days. The idea of this exercise is to encourage students to start using a circle a day, a simple shape, to represent how they are feeling each day. The circles evolve into a beautiful canvas over 100 days and before you know it students have a wonderful artwork that represents their life over the last 100 days!

Currently I have a bunch of students from all over the world doing this project with me right now. I'm loving using my pebeo acrylic paints and setaskrib markers to work wonders on the canvas. Here is where I am at right now.


I'm finding that sometimes i don't get a circle completed because i'm waiting for paint to dry! However, I know what I'm intending to do so as you can see i've started whiting out some circles to use as a background for the days painting or drawing. I've also used to scraps of fabric so far and on one it has words that meant something to me on the day i glued it on the canvas and the other was blank calico that i then used my Setaskrib marker to write on as i wanted words rather than pictures for the days' circle.

You can vary the sizes and orientation of the circles. Yesterday i used a felt round pot holder to paint an impression on the canvas. I do this because I love tea and i often sit my teapot on something similar to this.

To get you started I have compiled a snapguide short course below. You can use any size canvas. this one is 26 x 26 inches square.


Have fun and enjoy your journey of 100 circles in 100 days.


Saturday, 27 June 2015

GDT- Karen Hawkins "Smoosh Painting"

Fabric 'Smoosh' Painting with Setacolor

Hi all!

  Karen@WhimsiKa here!

Today I have a simple tutorial on how to make sweet little fabric squares using Pebeo Setacolor Fabric paints and, what I call, the 'smoosh' technique.

  The fabric for this project needs to be a fairly lightweight and at least 50% natural fibre OR use good old baby wipes. The brand I mention at the start of the video is lovely and thick and allows for plenty of 'smooshing'. 
My washing line has never looked so pretty!

  I love that we can use this technique to make duplicate prints while a piece is still wet...just add a little spray of water, overlay with another piece of fabric and 'smoosh' the paint in with a brayer (you could also use a rolling pin, a baron or any other rounded object). Just remember, the more prints you take from one piece, the paler the colours will become


  The resulting pretty fabrics can be used in a fabric collage, or sewn into bags or cut up and turned into embellishments...so many uses (see the video for other ideas)

NB. One point I'd like to make...the stain you see on my fingers is NOT from the Setacolor paints, but from a previous project. The Setacolor paint washes off the skin quite easily!


You could also quilt on it.


Fabric flowers is one option for your hand
painted fabric


Hope you have fun getting messy with this technique. I sure love the surprise thst each piece gives me!

Hugs Karen!


Sunday, 29 March 2015

My son loves my Pebeo Fabric Paints now!!!

My son wanted his name Printed on His SAPSASA Jacket. You can get this done onsite at the events but its a bit expensive and you have to wait in line. Once I got my Pebeo Setacolor fabric paints I thought I could maybe give it a go myself with some of my lettering stamps.
It worked a treat.  The Fabric paint stamps really well, you can put whatever wherever you want. Its so cool, I cant wait now to try more stamping on fabric.


  Check out How to Personalise a School or Sport Top by Siann Watts on Snapguide.

Thursday, 12 March 2015

Cool Customised Calico Shopping Tote


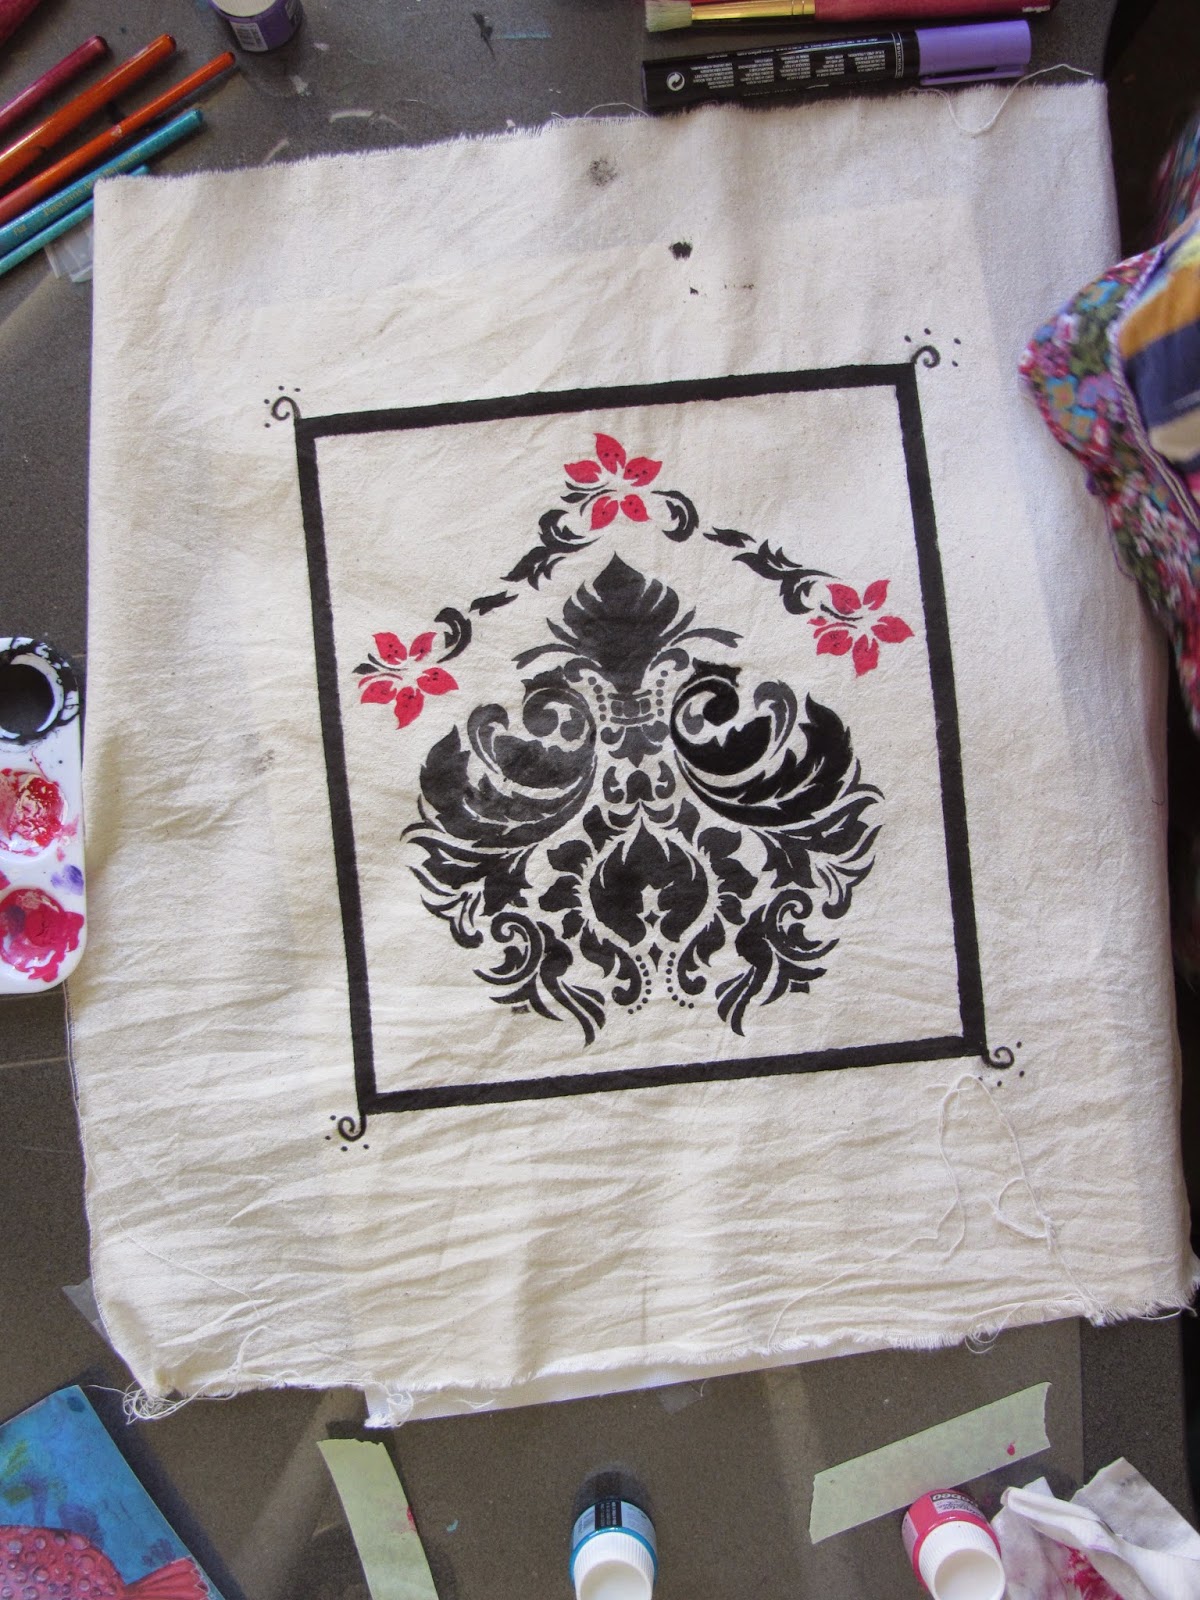
Believe it or not this is my first "play" with Pebeo Setacolor Fabric Paints. This just goes to show how easy it is to create something cool and customised.  Here's how I did it...

  • Grab a piece of calico or other firmly woven cotton fabric, wash it first to remove sizing (in detergent without fabric softener) and iron.
  • I started with this stencil that I already had in my art supplies (sorry that it's old I can't tell you where I bought it or what it's called but you would be able to find something similar in your craft store).
I taped the stencil down with some removable masking tape to help keep it in place.

  • Next I mixed Pebeo Setacolor Opaque in Black with Pebeo Setacolor Thickener. This is to make the paint a very thick consistency so it doesn't spread on the fabric when applied or seep under the stencil. I experimented with just adding a small amount of thickener at a time and stirring until I was happy with the consistency.
  • Use a stencil brush (mine are from Princeton) to dab on the stencil. Try to keep the brush vertical and dab in an up and down manner rather than brush. This will help stop your stencil from moving and give you a cleaner finish.
  • I did mine all in one colour to keep it simple, except for three small flowers within the design that I painted in Pebeo Setacolour Opaque in Cherry Red. You may need to use a smaller stencil brush or other fine brush to get details depending on your choice of stencil.

  • To create the border I placed strips of Scotch tape about 1cm away from the straight edges of the stencil and painted inbetween, carefully removing tape and being careful not to move the stencil.

Ok, at this point I want to tell you are few things NOT TO DO, and how you might be able to fix it if you do do it...
  • DO NOT accidentally drop your paint brush on your fabric: You can see a black dot at the top of the fabric where I did this. I decided to cut right around the edge of my border and appliqué the picture onto another piece of fabric.
  • DO NOT smudge the edge when lifting the tape: I did little designs in the corners to try and mask this, then since I cut right around the edge this problem was also eliminated.
  • Make sure your paint has dried evenly before you lift the stencil: I think this was caused because I ran out of black paint and had to mix another batch, the second patch was thicker than the first. It was easily fixed by using a Black Pebeo SetaSkrib marker to carefully go over the black painted area. This also allowed me to fix any small stencilling errors, and better define the design. 
  • HOW A MISTAKE CAN SOMETIMES GIVE YOU A COOL UNEXPECTED DESIGN FEATURE: I purposely left some the lighter Black areas light, this gave my design a two-toned black effect which I really liked.
  • I also added a little red SetaSkrib marker to the outside of my flowers for depth and added a few black dots with the Black marker.


One I got to this stage I began to see that I could actually turn my "play" into something useful.  
  • I decided this could be a great design for a simple Calico shopping tote, so I cut a piece of calico to size (mine is 30cm X 45cm finished size but it doesn't need to be exact)
  • I used an double-sided iron-on adhesive web, "Heat n Bond Ultrahold" but there are plenty of different types available. Follow the instruction for your particular product, but basically you peel of one side, iron it onto your design, cut around the shape of your design, then peel of the backing and iron it onto the other piece of fabric.
  • I stitched on a piece of trim that I had in my sewing box to the bottom edge of the bag, this is optional, or you could use any trim that looked nice with the colours and design of your stencil
Once you have decided where to place the trim, pin it onto your fabric while it can still be laid out flat, and secure your trim BEFORE stitching up side seams

  • To make simple straps cut two long strips of fabric (mine were 5cm wide and 65 cm long) Fold the fabric in half vertically and press. Leaving a seam of about .5cm stitch down the raw edges to make a tube. Use a Loop turning tool to turn your straps inside out and iron to press them flat.
  • Next cut two strips of fabric the same width as your bag and about 5cm wide. This is to be a facing for the top of the bag so you can attach your straps. Finish the bottom edge your facing with a zig-zag stick, overlocker or other finishing method.
Stich in your straps before sewing up the side seams
  •  Layer the top edge of your bag (right side up), place the strap its desired position (mine were about 6m from each edge), and the facing (wrong side up) and stitch through all layers. Repeat with both the front and back side of your bag) 
  • Turn the facing to wrong side, edge stitch on top of the facing, at the edge of the seam, through the seam thickness.
Edge stitched will help the facing lay neat and flat

  • Sew up your side seams, finish the edges, then turn your facing in and press.

And there you go, one variation of a simple tote bag that you can make with basic sewing skills and Pebeo Setacolour Fabric Paints.  The possibilities for what you can create are endless.


Sunday, 8 March 2015

Using Pebeo SetaSkrib Markers and a stencil to create a unique design on fabric

Using Pebeo SetaSkrib markers and a stencil to create a one of a kind design. 


Here is the Video.....


Today I've used a stencil to start my design and used the Pebeo markers to colourise the design into something unique.

I used a stencil because that is an easy way for anyone to achieve the looks they desire and stencils are cheap and readily available.


It was a simple exercise to colour the design with the markers and in the video i show you different techniques in using the markers to create effects for your design.

Enjoy the video!


Thursday, 19 February 2015

To the Galaxy and BEYOND!


Currently trending right now are Galaxies, they are absolutely everywhere from home wares to art to fashion, the bright and beautiful galaxies are showing up in all sorts of places, including our blog!

Today we are going to take a Black cotton T-shirt and turn it into a walking galaxy this technique should work on just about any fabric surface! I will be attempting to make my own scarf later on this week.


Today we are working with fabric paints from Pebeo Setacolor in the opaque range.
Other Supplies used in this project
Black Cotton Tshirt/top
Pebeo Setacolor Fabric Paint in opaque I used all the colours featured in this image.
Household bleach
Paint Brush
Paper plates - to put your paint on
Spray Bottle
Sea Sponge
Foam Brush
Iron (to set the paint before washing)


If you are using a brand new item of clothing, throw it in the wash and wash it before using these paints, as the sizing and whatever else that is added to new clothes can become a resist for the paints.
(I washed my item after the bleaching process)

First I wanted to create a speckled effect to use as a spring board, I didn't want to go straight in with paint as I knew it would become to uniform looking and all my research on galaxy images they aren't uniform they are whimsical and delicate at the same time.
I grabbed my spray bottle and added some bleach and a little water together and tested the spray on the inside of my shower door to make sure I got a soft mist instead of heavy drops, once I was happy with the spray I then put my shirt onto a paint table that I'm not precious about


These images show how the bleach is reacting on the black top.


I put the paint onto paper plates. Each plate held a different colour, I also added white to each colour to soften it.


I then Grabbed my sea sponge and loaded it up with paint, you might want to dab off the excess paint to make it not so over powering all over, you want it to be a random effect as galaxies are just that random and beautiful.
I went in with the pink first and built up other colours.


I also used other tools to build up colour, I used a foam brush and did some dry brushing to diffuse the colour in places that I didn't want huge amounts of colour but more subtle look.


This is a close up of the soft shading of dry brushing with the foam applicator, it was soft enough that the bleach specs could still be seen through. I like the light washes it created.


Build up as much or as little colour as you'd like, this part is personal preference, I suggest getting a few images of galaxies you admire and just try recreating them loosely onto the fabric. 


There is no right or wrong with galaxies! I did go in with black and break up those big blocks of colour down in the right hand corner as I felt they looked too deliberate.


Once I was happy with the colour distribution I then went in with the tip of my paintbrush (the handle end) and made little bright white stars in various places, some little clusters and some just on their own to make the look organic. I had to restrain myself at this stage from covering it in little white dots cause I loved them!


Once you are happy with how your garment looks, you then iron it to heat set the paints so its good for washing! I just used an old towel over my top and cranked the heat setting to high one I knew no paint would transfer I removed the towel and then just ironed the top as normal. Ive also washed this time before the below image was taken and nothing has moved!

I hope you take the time to make your own galaxy print! I will be doing a scarf next! 


Enjoy creating other worlds on your clothing! I certainly did!

Bye for now
Courtney