I cant believe the enjoyment I have found in Pebeo's Glass/Ceramic and Fabric, paints and markers. I would never have thought they were for me, Nor did I think that I wanted to own anything that was painted on with these mediums. How wrong I was!
I have enjoyed creating each project, I have enjoyed creating original, unique gifts for family and friends, AND I love how these paints have rejuvenated, and recycled and made Cool my kids clothing. How plain used ceramic dishes have become pieces of treasured artworks.
These Pebeo Paints are seriously cool. (I was guilty of thinking the opposite) but not now.
The possibilities are endless and exciting.
My latest project involves taking my plain 10 year old cushions and painting a couple meaningful quotes on them. I Love them now, and it has made my living room look very cool. I love text!!!
Anyway Check out my tutorial below:
Showing posts with label Pebeo Setacolor. Show all posts
Saturday, 7 November 2015
Thursday, 1 October 2015
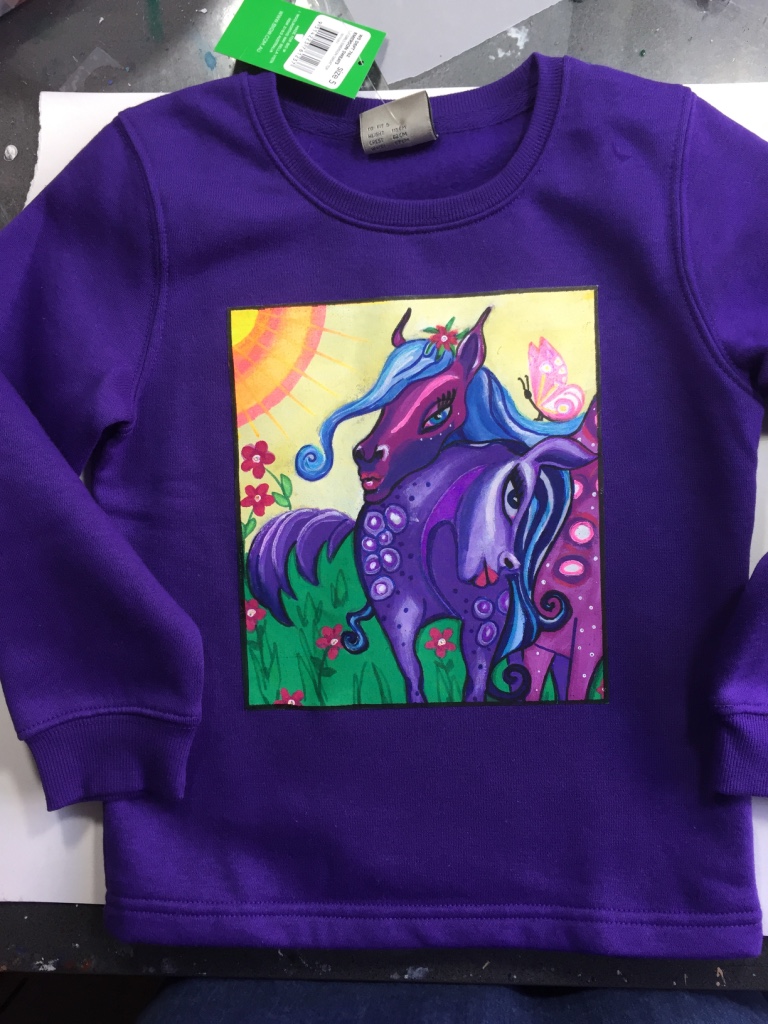
Paint Pretty, Purple, Pebeo Ponies
| "Purple Ponies" Wind-cheater |
Here's what I used for this project (You can really use whatever Pebeo Setacolour and Setaskrib you desire):
- Basic plain colour wind-cheater (washed without fabric softeners and ironed)
- Heat n Bond Ultrahold double-sided adhesive webbing (above) or other similar product
- A piece of plain, thin, white poly-cotton fabric (I actually used the back of an old pillow slip) make sure your fabric is washed (without fabric softeners) and ironed before starting.
- Pencil for tracing
- Pebeo Setacolor Opaque colours, I used Light Green, White, Bengal Pink, Garnet Red, Parma Violet, Butter Cup, Cornflower
- Pebeo Setaskrib Markers, I used all the colours from the fluro set (Pink, Yellow, Green, Purple, Blue, orange) and Blue, Green, Yellow, Blue and Black from the basics set
- Small round brushes, and one flat angled brush about 1cm wide
- Pretty Ponies design download
- Printer (to print the design)
- Iron to fix the paint when finished
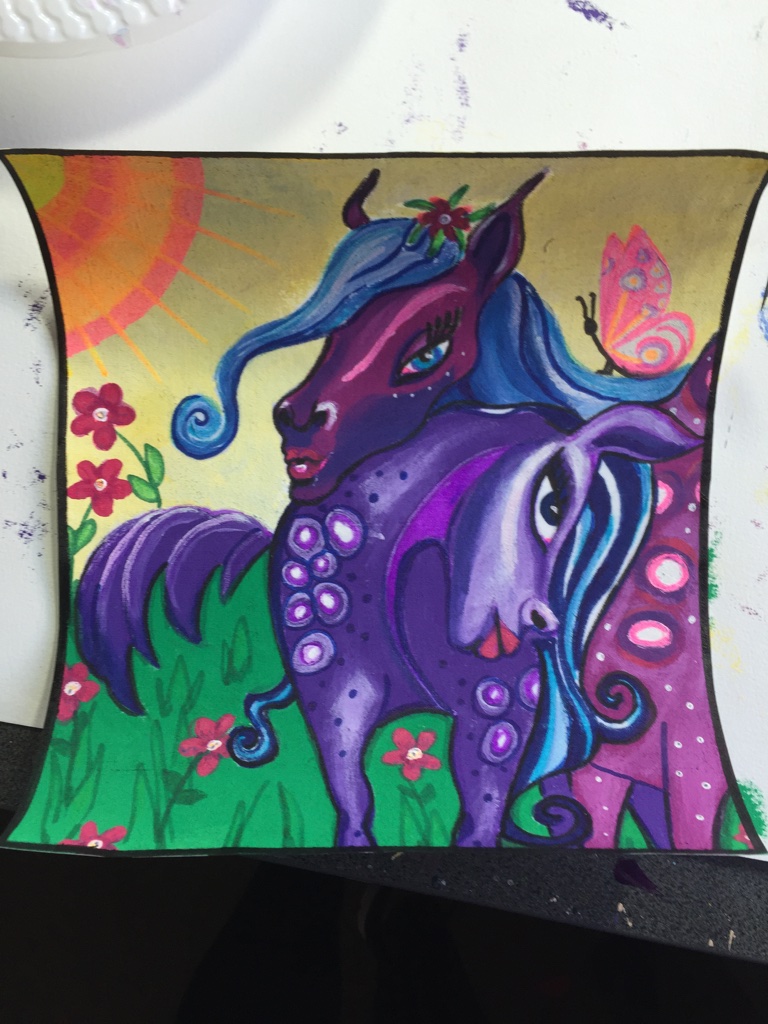
My Pretty Ponies design was inspired by some artwork I did quite a while ago.
| My inspiration |
I have included it so you can have another reference for colours and shading, but really use your imagination and have fun.
To begin the project download the design and print it up. Place your white poly-cotton fabric over the top of the print. The fabric should be thin enough to see the design right through and you can trace it with a pencil.
| Design traced onto fabric |
Once you have the design traced onto the fabric, go over the outlines with the markers. Don't worry about the colours being exact, use as close as you have, the Opaque paints will cover the lines.
Now have fun painting! You can mix the paints together to get a variety of colours and for shading. Mix them on your pallet or blend together on the fabric whilst they are still wet.
You can use both paints and the markers to colour...
Use a small round brush for finer details and your flat brush for bigger areas...
Here I decided to add a butterfly. You can see where I practiced drawing it on the outside of the design, then I just drew it in with a pencil.
I then went over the butterfly with white Setacolour paint. This help the butterfly "pop" out from the page when I colour it. The Sun was done using the Setaskrib Fluro Markers. Look how beautifully the blend.
Here is my finished design...
Now it time to use you iron to set the fabric paint. As per instructions on the packaging, you will need to iron for about 5 minutes. Then take your Heat n Bond (or other double-sided webbing) and follow the instructions to adhere your design to your wind-cheater.
Ta Da! It's done!
Tuesday, 22 September 2015
Label clothing items with Pebeo fabric paints.
A Quick and easy way to label your kids clothing, when you don't have access to an embroidery machine. A Neighbor needed her children's hats labelled for school, so using Pebeos Setacolor Fabric Paints I set to them with a paint brush. They looked really good, and my neighbor was happy too.

Check out How to Label Clothing Items With Fabric Paints. by Siann Watts on Snapguide.

Check out How to Label Clothing Items With Fabric Paints. by Siann Watts on Snapguide.
Thursday, 20 August 2015
Spring Time Tassles
Boho Tassels
Tassel dyeing with:
Pebeo SetaColor Opaque
Winter is nearly over, but here's a way to spend the last of the chilly weather in order to add some spice and colour to you Spring wardrobe.
Using Pebeo Setacolor Opaque paint, you can easily personalise your accessories to match your wardrobe. There's nothing more satisfying than saying "I made it myself". So heres how to add some boho basics to your wardrobe.
I hope you have fun with this simple and rewarding project.
SUPPLIES
Pebeo SetaColor in:
Oriental Blue
Butter Cup
Bengal Pink
Fine /regular cotton string
Princeton brush set
20 gauge wire in silver
silver finding and beads for embellishment
Silver chain
| Pick from the range of colours available. There's sure to be a colour or mix to suit you wardrobe. |
A couple of brush loads of colour to the bowl before adding a dash of water
fro soaking the cotton string.
Once you have a descent colour dye mixed, add the cotton/natural string(apron 2metres ) for dyeing
and mix it around with your brush. Let colour fully absorb before
squeezing excess colour out.
DON'T forget to iron the string so that the colour is permanent.
| Dyed and heat set string. |
Cut a piece of cardboard around 7cm long and have a couple of pieces of string dyed for tassel
making around 2meters . (Plus extra for tying if needed.)
Replace the thread in image with 20gauge wire around 20cm in length.
Wrap the thread around the pice of card.
Cut the end of thread/tassel. (knot thread at the top if not using wire. )
Here's the wire bent throughout the centre of the tassel ready for threading.
Using an end cap, thread the wire through the hole .
Wrap wire.
Add extra beads for interest.
Here's an ides for a change. A crescent tube thread with wire and loop at either end.
Add some fine gauge wire in a contrasting colour around the tube
also keeps the tassel centred.
A selection of hand made tassels for creating your own unique pieces of Spring jewellery.
I hope you have been inspired to create some new designs
for you Spring wardrobe.
It's a fun way to add some eclectic and boho style to your Spring accessories.
See you again soon
xox
Kerry Sinigaglia
Friday, 7 August 2015
Jeans for Genes Day! Today!!! Fabric painting Fun with your kids!
Good Morning! Its Siann again enjoying Pebeo's fabric paints
What better day to have a ball painting your boring Jeans than on Jeans for Genes Day! Pick out your plain jeans and entertain your children for a fun time crafting. With the added bonus of creating a funky pair of Jeans that are a complete original walking masterpiece!
Check out How to Jeans for Genes Day by Siann Watts on Snapguide.
What better day to have a ball painting your boring Jeans than on Jeans for Genes Day! Pick out your plain jeans and entertain your children for a fun time crafting. With the added bonus of creating a funky pair of Jeans that are a complete original walking masterpiece!
Check out How to Jeans for Genes Day by Siann Watts on Snapguide.
Monday, 6 July 2015
Mix Media Goddess Holiday Project
This may look like a difficult exercise but it's actually isn't, and I think creating a Goddess portrait is an inspriring holiday project for any gal, from pre-teen to whenever. Most of this project can be done with stencils, although you could decorate with your own doodles if you wish AND I have included a PDF for you to download if you prefer to trace my goddess face.
When it comes to materials, really the options are limitless. If you have been following other Crafty Crusaders blogs and trying out some of our awesome projects then you would already have a collection of Pebeo Fabric, Porcelain and Glass paints and for this reason I am using these materials extensively through-out because I want to show you they are not just for craft - you can create a beautiful mixed media painting with them as well. A mixed media project like this is a great way to use up whatever products you have on hand.
Here is a basic materials list:
- 16 X 16 inch Wood Painting Panel (you could use a stretched canvas but you may get slightly different results)
- Clear Gesso
- Graphite pencil and fine ball point pen for tracing
- Scotch Blue Painters Tape (available from hardware stores)
- Selection of stencils (I really recommend collecting stencils if you like doing craft or creative projects but if you don't have them - decorate your sections free hand).
- Selection of Acrylic paints, including Pebeo Setacolour Opaque Fabric Paints, Pebeo Vitrea 160 Glass Paints and Pebeo Porcelaine 150 paints.
- Pebeo Porcelaine 150 in Gold
- Pebeo Vitrea 160 Iridescent Medium
- Selection of paint markers as above, as well as other brands such as Posca and Molotow.
- White Paint Pen
- Schmincke Aero Color Ink in Brazil Brown
- Small round paint brushes
Firstly, download a PDF of the Goddess here if you wish to trace it and I will show you how to copy it on to your substrate. Of course, alternatively you can draw your own.
Step 1. I used a 16 X 16 inch Wood Painting Panel available from art shops. Because I wasn't sure what I would do with at first, I covered with a coat of clear gesso. To be honest I am not sure what difference this would make to the rest of the process, but on the packaging it suggests to coat the panel with gesso primer so I did.
Step 2: If you are drawing your own Goddess, go ahead and do it in your preferred manner. If you are using my Goddess, make sure you have downloaded and printed a copy from this link. Print the PDF on normal copy paper A4 size from your printer. You need to colour the BACK of your photocopy, covering the lines you wish to trace with GRAPHITE. I used a Graphitint pencil so that the colour was different and you could see it. Then place the photocopy onto your panel in the desired position with the graphite side down. Now use your ball point pen to trace over the lines. The pressure of the pen will transfer the graphite onto the wooden panel. (Note you can see where I have coloured in with graphite because I am using my own tracing on transparent paper - you won't see this if you are using a photocopy).
It may be faint at first, if so go over the lines with your graphite pencil so you can see them clearly. You may need to add a little extra to the tracing in the shoulder and body area to take up the space if you panel is the same size as mine.
Step 3: This is one of my favourite techniques. Use Scotch Blue painters tape to mask out some straight lines and create "sections" to work in.
Step 4: Now you want to take your stencils and place a separate design in each section. I recommend sticking to a similar family (such as blue, green and yellow) and one contrasting colour (such as shades of purple). The fun is in experimenting and creating for yourself, but so you have an idea I will give a bit of explanation for how I created each of my sections.
| section 1 |
| Section 2 and 3 |
Section 3: First stencil with Pebeo Porcelaine 150 in Parma Violet. Use a marker, or the paint with a fine brush to touch up where necessary. When dry, the background is then painted with Setacolour Opaque in Oriental Blue.
Section 4: For this section I painted the solid colour first using Pebeo Setacolour opaque fabric paint in Light Green. once dry I stencilled over the top with Pebeo Porcelaine 150 paint in Lapis Blue.
| section 4 |
Section 6: For this stencil I used Pebeo SetaSkrib markers in Light Blue and Purple to do the stencil, then painted in the background carefully with a small round brush and Setacolour Opaque in Buttercup.
Section 7: Solid colour painted first, Setacolour Oriental Blue, stencil and Setacolour Opaque in Buttercup.
| Sections 6, 7 and 1 |
| Gesso your Goddess and redefine your lines. |
| Goddess Dress scraped back. |
| New Goddess Dress |
The skin colour was created using a mix of Pebeo Porcelaine 150 paints in Ivory and a just touch of Scarlet Red and Gold. To get the darker shading I added a touch more red to the mix.
For the lips, Red SetaSrib marker, and the eyes Vitrea 160 Marker in Amber. Use a black Setaskrib for the pupil (don't forget to leave a white highlight for sparkling eyes) and to define the eyes and the eyelashes. I used a white paint pen to add the white highlight in the pupil and the white of the eyes.
I also added a white hi-light to the bottom lip, and some dots on her cheeks for magical sparkle.
I used the the Vitrea Amber marker to draw a defining line around around my Goddess and drew in features such as the nostrils.
I used red and Gold for the bird, but this could be anything you like.
Step 8: Once you have completed your Goddess its time to take a collection of paint markers, you can use the Porcleaine, Glass and Fabric markers you have in addition to any paint pens such as POSCA and MOLOTOW to add the little details you can see in each section. The Opaque Paint pens are also fantastic for covering up messy bits you don't like and fixing up mistakes!
Step 9: Use a circle template (a plate is as good as anything - its just about finding the right size) to mark in your pendant. I then used dots of red, white and gold paint pens to represent the chain. The word "Goddess" is written in red paint pen.
Step 10: Finally I decided try try and accentuate the woodgrain feel by using Schmincke Aero Colour Ink in Brown Brazil to stain the blank spaces. I love this look, but it's optional of course. You could also paint the sides of your wood panel to match.
| Steps 7 and 8 |
Step 10: Finally I decided try try and accentuate the woodgrain feel by using Schmincke Aero Colour Ink in Brown Brazil to stain the blank spaces. I love this look, but it's optional of course. You could also paint the sides of your wood panel to match.
| Done and ready to hang! |
Labels:
Dee Noney,
Dee Noney Art,
Design Team,
Free Download,
kids projects,
Mixed media,
Painting,
pebeo,
Pebeo Markers,
Pebeo Setacolor,
Pebeo SetaSkrib,
Pebeo Vitrea 160,
Schmincke,
Schmincke Aero Colour Ink
Wednesday, 1 July 2015
Easy, Fun, Paint and Sew An Owl with Pebeo Fabric Paints and Markers
If you are looking for a fun project to try over the school holidays, why not try a paint and sew project? It's not only fun, the results are adorable and you can teach the kids some practical sewing skills such as sewing on buttons and basic stitches.
Here is a list of what I used for my project, but you could adapt using whatever you have and choose you own colour scheme.
- 20 X 25cm stretched canvas (choose the box shape with thick edges so you can easily hang your project when finished.) I recycled an old canvas from a previous project I no longer required - I just painted over it with black gesso.
- Owl Stencil, you don't have to choose an owl, there are plenty of different stencils available in craft shops. You can always draw your design free-hand, but I think stencils make things easier and more fun for kids.
- Piece of calico or white cotton fabric big enough to paint your stencil on.
- Fabric trims, buttons etc
- Embroidery strands for decorative stitching
- Printed felt piece (mine was from Spotlight)
- A selection of Pebeo SetaSkrib markers and fabric paints. I used light blue and dark blue markers, light green and dark green markers, orange and black markers and white Pebeo Setacolour Opaque fabric paint.
- Small round paintbrush (if using fabric paints)
- Tapestry needle (or similar)
- General sewing thread (to sew on trim and buttons)
- Spray adhesive.
Step 1. To start with choose your canvas. You can buy a new one and leave it unpainted, paint in the colour of your choice, or like me recycle an old canvas thats no longer required.
Step 2: Iron your calico and fabric and begin by tracing your stencil, I use the black setaskrib marker.
Step 3: Now is the fun part - getting to colour in your stencil! The first thing I did was fill in the black lines to make them solid. It's easier to colour in if you have "sections" to work on. For the Beak I used an orange Pebeo SetaSkrib marker. For the body I used a combination of light blue and dark blue SetaSkrib markers. You will find that the colours will blend in together on the fabric if they are still wet which creates a really nice shading effect and gives dimension to your painting. Start by doing a line of dark blue on the outide, the go over it with the light blue. Practice on a scrap bit of scrap fabric to see how it works. I did the same on the feet using light and dark green SetaSrib markers. For the eyes I used white Pebeo Setacolour Opaque paint and a small round brush.
Step 4: For the head I used my light and dark green markers again a drew in some parallel lines for an interesting effect.
Step 5: The wings were done by overlapping bands of colour, light green and light blue markers. Its fun to blend the colours together, but its a good idea to test out the colours first on a scrap, as blending the wrong two colours together could end up making a muddy unattractive colour!
Step 6: Added some white dots on the wings with the white seta colour fabric paint to make them look "feathery".
Step 7: This is an optional part, but a fun way to teach your child to sew on buttons. I used a couple from my stash of oddments, but there are plenty of really cool buttons around.
Step 8: I used a tapestry needle and some orange embroidery strands to do some basic decorative stitching. You could take this as far as you like it you know embroidery stitches, but I kept it very basic.
Step 9: Once you are happy with your finished design trim it down to a size that looks right. Remembering you want to leave room for a trim and also be able to see your printed felt underneath. I first used a tacking stitch to attach my design on to the felt. Then I pinned my fabric trim on to cover the tacking stitch (no need to remove it) and the raw edge of the calico. I used general sewing thread to hand stitch my trim on. (You could machine this if you have one). I used white thread and was careful to bring my stitches in and out on the white lines of the trim - which made my stitches invisible. I did this on both the inside and outside lines of the trim. How you attach yours will depend on the style of trim you choose...
Step 10. Trim your felt down to the right size to fit on your canvas. Use a spray adhesive to attach the felt to the canvas. Follow the instructions for your adhesive, but generally, you spray both surfaces, wait a minute or so for the glue to become tacky, then press the surfaces together for a permanent bond. Now hang it up to enjoy!
![]() |
| Done! |
Subscribe to:
Posts (Atom)