Showing posts with label Kerry Sinigaglia. Show all posts

Friday, 11 December 2015

Monster Madness


 MONSTER MADNESS


Hey guys. I had such fun with this blog creating some very special Christmas presents.
I'd never really done anything like this before, but found out, I really love it.
All I used to create my these little guys was some Canson watercolour  paper A4(Montval,medium cold press) 300gsm, Princeton Neptune  watercolour brushes (Quill: 4 & 12, scribe:6) ,  my fabulous Schmincke water-colour pan ( 36 half pan + room for 12 more), and a few final touches with my coloured pencils.
Truly. That's it.
Well, that and a good and sometimes weird imagination. 


I like to draw a boarder around where my image will be so I know what space I have to work within. This just helps so when it comes time to framing, your artwork is as centred as possible and you don't lose any of your image. 

For inspiration, it's worth having a look on Pinterest for illustrations and images of dragons, monsters etc. There's  a lot of drawing tips there too if you need guidance.  


After pencilling in your creature, it's time to start playing with your watercolours. The variety of colours and the 'mixes' you can create with these Schmincke are wonderful. Personally, I have trouble trying to leave white space, but I was very mindful of this this time. 


So with some finishing touches  using coloured pencils after erasing any old pencil lines,  It's ready for you signature and framing.


Here's another one I got started on right away. I told you I really loved creating these. And I hope you do too. 


Creating the watercolour base ready to build on.


******
Wishing you all a wonderful holiday season.

xox

Kerry Sinigaglia


Friday, 4 December 2015

Pebeo 'PEN'dants for your X-mas tree


Pebeo "PEN"dants
Make it a very Pebeo Christmas


With the holidays approaching FAST, and in our case, we still have no X-mas tree up (YIKES) , perhaps there's still time to create some fabulous christmas tree ornaments with the family and your Pebeo fabric markers. 

All you need are the basics: Pebeo SetaScrib Fabric Markers in Fluoro or basic colour packs
A piece of pre washed calico
Black permanent ink stamp 
Christmas stamps. 
And last but not least a bit of ribbon and some VERY basic sewing skills. 
So let's get started

Choose a stamp and add black permanent ink to it and stamp on image. Use a circular object(e.g.; masking tape roll) to draw an outline approximately  1 1/2cm from stamped image.

Start adding colour to the stamp.
This can be to match your decor or just because you like the colours.
Here, I've used a very simple snowflake stamp, so there's little to colour in but dots etc add a nice touch.


Before you begin sewing, remember to iron your design so as it's permanent when washed.


If you can handle a sewing machine then stitch away. I chose not to turn my piece inside-out as I want the edges to fray over time. A personal choice. Remember to leave a gap to add the stuffing and the ribbon.


Add the stuffing, add a loop of ribbon and sew up the hole and you're done.

Her's a few I made. Washed and ready to fray the edges. I added a couple of X-mas tree stamps to my selection as well. It all depends on your choice of stamps really and what YOU like.


Wishing you all a wonderful festive season,
XOX

Kerry Sinigaglia


Wednesday, 11 November 2015

Canson Art book 180º

Can…can…can you do the Canson?
Canson Artbook and charcoal


Some of the best things about the Canson Art book 180º is that it loves your mobile art nature. In that, I mean, the quick sketches with pencil, charcoal  and pen whilst you're out and about and want to quickly capture a moment , other than on your mobile device. 

With your journal, a willow stick and an eraser,  you're ready to capture the world. 
Here I've made a quick background of charcoal and then used an eraser to create  a face. Only a little addition of some more charcoal and your done. 

Just to finish off before I travel home, I divided the pages with a sheet of Canson Tracing paper and some wash tape. I'll give her a light spray of fixative when I get back to my studio. 

I hope you enjoy some outings and some life sketches with your Canson art Book. 


With Christmas on our doorstep, I hope too have a little something special you can create for your loved ones when we next meet.

Till then…

xox

Kerry Sinigaglia

Wednesday, 14 October 2015

Schmincke Inky fun

  
Airbrush your cares away
with Schmincke Aero Color


Being the month of Halloween, and INKtober, I decided to share with you a sample  of some of the great backgrounds  that you can achieve with Schmincke Aero Color acrylic inks and an airbrush. 

Supplies include an airbrush, Schmincke Aero colour inks in colours of your choice, Airbrush medium and stencils. 

I used  Opaque white, Magenta and neutral grey .

I have a great leather bound photo album from Florence I   love to create my more 'spooky' artworks in. The paper is very absorbent and great for this technique. 
After selecting a range of stencils and setting up my airbrush I laid out my spiderweb stencil first and used white ink for the first layer. 


Mixing a few drops of white and magenta and some airbrush fluid into the airbrush cup, I created a softer pink and sprayed away, this time using a tree stencil.

This is how the sprays look
 on the grey photo album paper.

I didn't have a crow stencil, bu this bird stencil
 worked just as well with the neutral grey ink. 


Here's the end result. It's a lot of fun playing with these great inks in an airbrush. The great thing is, you can create great backgrounds to work on so easily, and the ink has a wonderful soft look.
NOTE: The rest of my page was created with pencil, acrylic paint and some pastel. 
Another sample of some airbrushing
 using varied stencils

Now, it's just up to you as to what you want to create. Of course the ink will react differently on different surfaces and keep in mind it is water resistant once dry. So, I hope you have some fun with this and create some inky backgrounds you can turn into something special. 

See you all again soon

XOX

Kerry Sinigaglia

Friday, 18 September 2015

Mepxy on craft wood

 Crafting with Mepxy


Mepxy markers on craft wood are a marriage made in heaven. 
Super juicy and a huge colour range makes them a favourite for craft, art, scrapbooking and illustration.
School holidays are coming up fast and this is a great way for the kids to have some fun and adults to join in by doing the tricky grown up bits.

Supplies for this project:


  • a craft wood figure
  • wood burning tool
  • white Sharpie or Posca pen

A range of Mepxy markers: P31 Orchid Ice, C34 Fair Aqua, B04 Sky Blue, C15 Aqua, L03 Yellow Green, Y08 Acid Yellow, R09 Hot Coral, R17 Red Orange.


Here I have a blank craft wood cut out ready to get started. 


I decided to add some detail with my wood burning tool. I'm an absolute novice at this, but you have to start somewhere. And it was fun. But I may need a little more practice. 

I added a little more depth to the pupil with the script tool


I continued adding detail to the fox with this tool. Then swapping and trying some of the other tools. You don't have to do this part and can detail the whole piece with your Mexpy markers.


This tool was trickier than I thought, but I gave it a go.
 I think that's the point of it all.
Stepping out of your comfort zone
 and trying something you've never done before.
 It's a great feeling.


Start adding a little colour to the main areas such as the eyes.

Hot Coral

As you can see, the colours are vibrant and although they bleed around the edges, once you begin adding more colours, they all blend together. 

A lighter blue for starters around the eye. Sky Blue.

Add depth with slightly darker shades such as Fair Aqua.


Now for a little Sky Blue.


Okay. I went a little crazy and really added a whole mix of colour on intuition.
A dash of Acid Yellow and Yellow Green, and a bit of Red Orange and shadow with Orchid Ice. 
If you are having fun, it's a good thing right?


To make the whole thing really pop, I added touches here and there with dots etc with my white Posca acrylic pen. Again. I was just going with my gut and having fun. 


And there you have it. If you'd like to have an afternoon of fun with your kids, make a gift, or just want to spend an afternoon of crafting, why mot sit down , pull out our Magical Mepxy markers and get started. 

All the best to everyone

XOX

Kerry Sinigaglia


Wednesday, 8 July 2015

Birds of a Feather

Fancy feathers with Mepxy Markers.


An easy and fun way to spruce up plain white feathers to add to craft projects such as Hear pieces, scrapbooking and home decor such as Dream catchers . 
For this you'll need a selection of Mepxy Markers, white feathers, craft matt or scrap paper. And for some special additions, why not try some Schmincke Aquarelle masking fluid and Schmincke Rich Gold powder/dust. 

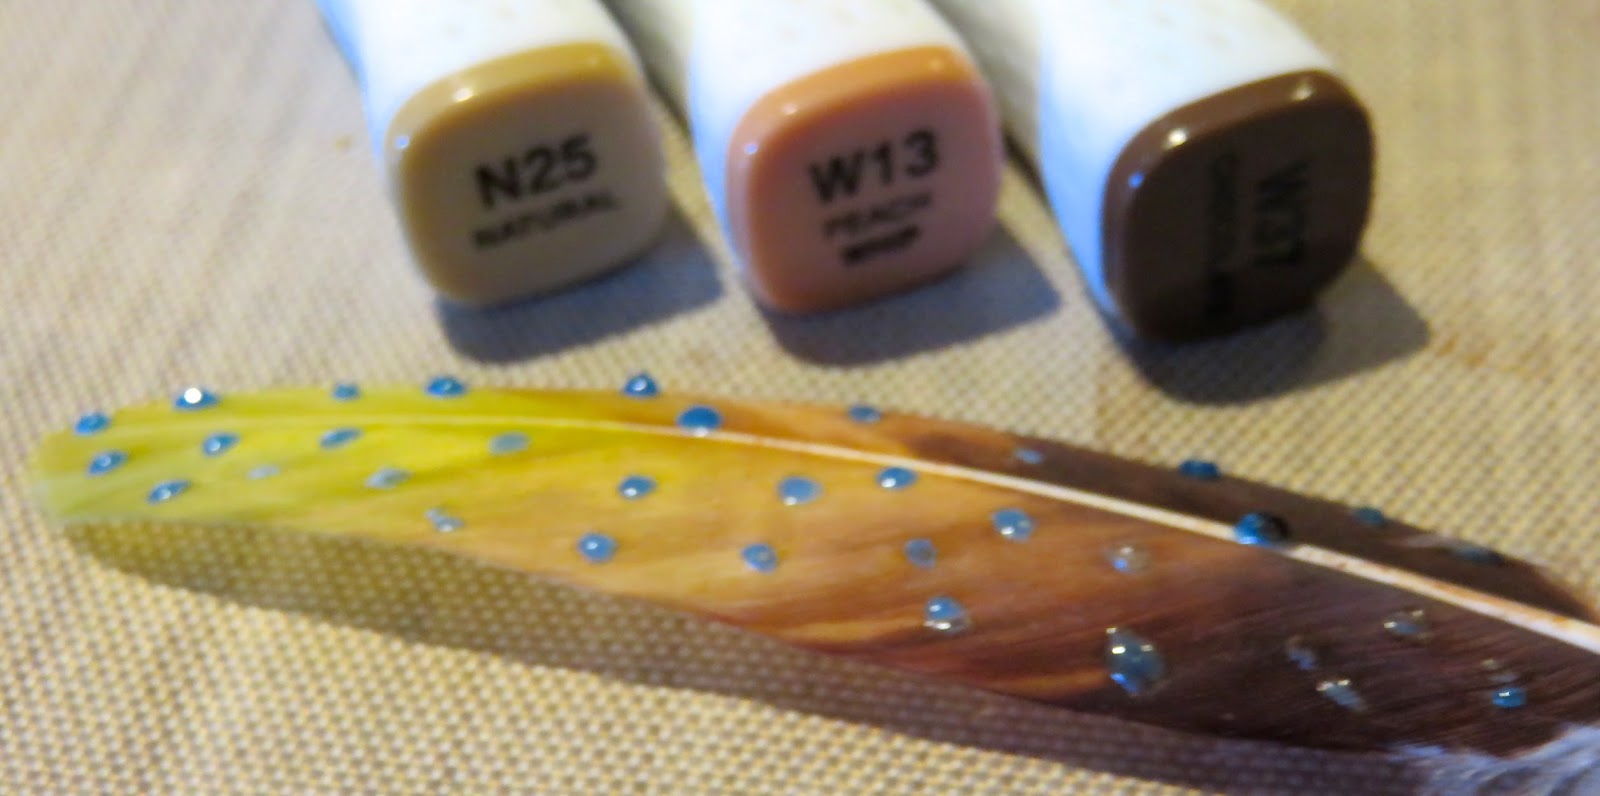
Colours I used in the Mepxy range :Y11 Pale Yellow, W13 Peach Whip, N25 Natural, W37 Chocolate
Bright colours: B29 Ultramarine, B06 Peacock Blue, C49 Vivid Blue, C05 Cyan, L09 Fresh Green, G07 Vivid Green, W29 Sienna.

Here we go. 

Add caption

It's as simple as taking your marker and working your colours up the length of the feather. I started with W37 chocolate. Overlap the next colour, which was Peach Whip W13, then Natural N25 and finally Y11 Pale Yellow. It's a good idea to play with the colours on some Canson Bleedproof paper to work out how the colours will look on the feather. 


Blending with your 00 blender marker really helps the colours flow into one another. Oh! And it's ideal to work on a craft matt , but if you don't have on some paper underneath will suffice. 
You can create so many looks, and by researching birds and all the different colours there are, the possibilities are endless. 
By adding stripes or spots with a darker colour  the feathers can be personalised.
Blending with your Mepxy 00 softens the stripes and they look less 'stripy'. 


Next , let's try some Schmincke masking fluid. A few dots  or stripes of this will mask the original white base colour. The fluid is blue when wet, and becomes clear once dry. Once completely dry, add Mepxy markers. Once you're done with the colour, simply rub off the masking dots.
                                                                                                                                                                                    Why not try some Schmincke gold dust as well. Just spray a little water on the end of your fester and pick up a little gold dust on your brush and tap the dust over the wet area. Once dry it looks amazing.


Here's how the gold dust looks when
dusted over the water. It becomes
liquid gold. Awesome!


Here's a few of the different  feathers I created and with the stem trimmed, I added them to some beads 
and and thread to create a boho hair clip. 


Heres the Rainbow feathers, created with the colours you see here. They are also listed in the supplies.


 I hope you have fun with this, and  you enjoy coming up with different  projects and ways to use your personalised feathers .


See you next time

XOX

Kerry Sinigaglia

#Mepxy markers #Schmincke