Showing posts with label Schmincke. Show all posts

Saturday, 14 November 2015

Decorate these super cute gift boxes


The gift giving season is almost upon us not only like do I like to give handmade presents but sometimes whether that be just a small gift of choccies or something we can give them in a handmade box that makes it all the more special.

 These boxes are just simple little cardboard boxes available from Spotlight. This project is really two steps, the first step is to paint them with acrylic paint. As they are cardboard they really suckup the paint alot, so the trick is just to apply quite a few layers allowing them to dry in between.

For this box the lid comes in two parts so i thought this would be really nice to paint a bold contrasting colour - just take this out and paint it that way you don't need to worry about the edges. - Did i mention you need a few layers of paint - ;) just be patient it will be worth it in the end.

Allow this to dry completely before you move to the next step.

All the parts of the box painted.
NEXT comes the fun part the decorating. 
I just love the Schminke Aerocolour inks and the liner pens that you can fill with your favourite colours!

I have the fine tip pen here with the Cyan ink. This is one of my favourite colours to go to.

Really from here is up to you with how you want to decorate. I used a white gel pen for the white areas.


Starting to add my decorations.


I think this would also be a super cute and easy little project you could do with the kids of all ages.  You could run it over a couple of days and get the painting out the way first and decorating in the next session. Or if you have really little ones you could do the painting your self and just let them decorate.

BOX IDEAS:  They could use one for their little lego bits or would make a lovely little storage box for jewellery or hairbands. You could also write some words on the top to say what needs to go in there or inspirational quotes - up to your imagination.

Thursday, 22 October 2015

INKTOBER Sun Goddess & Schmincke Inks with Michelle

Continuing  on the INKTOBER theme I have explored with some more ways you can use the Schmincke Inks. These inks are so yummy, the colours are so gorgeous.

I have a quick tutorial for you on how I have created my Sun Goddess.

I have used the Schmincke masking Fluid to mask out some quick features for

Next are a couple of techniques for creating depth in your backgrounds using stencils and stamps.


I have used the Copper, Vermeil Gold & Gold Pebeo Cerne Relief Outliners on the hair and headpiece. I love how these outliners work work so well with mixed media :)


Tuesday, 15 September 2015

Easy kids school holiday activity


Hello! Felicity here today.

School holidays here in Queensland starts next week. At the beginning of the school holidays I like to create a little list of activities. It helps me be a little prepare when 'boredom' sets in for the little boys.

So I did a little practice run with an activity.

I wrote out my daughters name in big letters on Canson water colour paper. I then ask Mister six if he would like to use watercolours to colour in her name.
Needless to say no hesitation.

I then used a black marker to outline her name.
Looks pretty cute.

Mister six then asks "Mum, what about my name?"
Yep, school holiday craft number 1 in this house!


 photo b14aab11-c343-4b9f-bec1-896291fc7892_zpspbti8bqf.png

Friday, 28 August 2015

Canson Paper and Schmincke Watercolour Sketches!

Schmincke, Canson, Princeton!


Hi all!

Unfortunately I was a bit hard-pressed for time in delivering this tutorial because I am under the pump with my final semester at University, so I will hopefully deliver another tutorial on drawing proportions very soon. However, in the meanwhile, I thought I could share with you some of the paintings and sketches I have created using Canson papers and Schmincke Horadam Aquarell Watercolour Paints.

I bought these gorgeous paints a while back and have fallen in love with watercolour all over again. I bought a set of 24 1/2 pans and have had so much fun with them.

The Schmincke watercolours have such a strong pigment and make painting and using the paints so much easier. You know those paints that you've had in the past where you have laden your brush with paint, only to find within a few strokes it's practically all gone? This is the exception, I remember when I first tried them and I touched my wet brush ever so lightly onto the paint and then used it and the colour was amazing! It also lasted so long and this works out in your favor, for not only does it save time and makes working more efficient, but you end up using much less paint because you don't need so much onto your brush.

Tip: Wet the paint brush, rather than wetting the pan, this way you can keep your paints much cleaner.

 Here are some examples of the more involved paintings I've done using these paints:

Truth
 

 Life

 Way

Tip: When building up a painting like this in layers, start with a wash that covers your whole background, so you aren't left with noticeable white spaces.

 The Glass Slipper

Tip: I built this painting up from the lightest colours to the darkest.
A Psychedelic Forrest

~

This is mainly what I use in conjunction with the Schmincke Paints:

Canson Watercolour Paper: This one is a Medium, 185 gsm. I use both the A3 and A4 sizes. I have been using this paper since I started painting when I was 14, I used to save up my pocket money for buying pads of paper!

Princeton brushes, I have a number of sets that I've used which work really well and are affordable too!

Now here is a bit more about the paints:

You receive this super cute colour testing page where you can use your colours and then refer back to it when selecting colours.

The box mine came in, I nursed it preciously home.

Inside the box!

This is what my paints look like now after the dozens of paintings I've used them for!

It appears I am fond of the green colour.

Tip: If you want to keep reusing the same colour mix that you've created, mix the colours on either a plastic or metal surface (like this one) so it doesn't dry so quickly and can very easily be re-hydrated. If you use paper, it just absorbs the paint and dries out super easily. Especially with the pan sets opposed to the tubes of paint.

Some more sketches:

This really shows off the vibrancy of the paints.


 You can see a bit of the bleed effect in the tulips where I overlapped the red onto the yellow.


 This really shows off the nature of the paint. I just wet a part of the paper and transferred paint into the patch and then nudged it with the brush.
 Using a slightly dry-brush technique to achieve this textures.

Tip: Using a brush with a flat/square tip can give you these beautiful marks shown above. Simply wet the brush but then only touch the very tip with the paint and drag it in short succession.


 This was actually the very first thing I painted with the watercolours as a test, was a lot of fun!


Mixing the paint with other mediums.

I hope you have learned a little and hopefully been inspired!

~
Find us on Facebook:
Instagram: @mepxymarkers
_________________________
Please send us your work or anything that you create! Thanks for watching!
 
Natalie Wyatt

Thursday, 23 July 2015

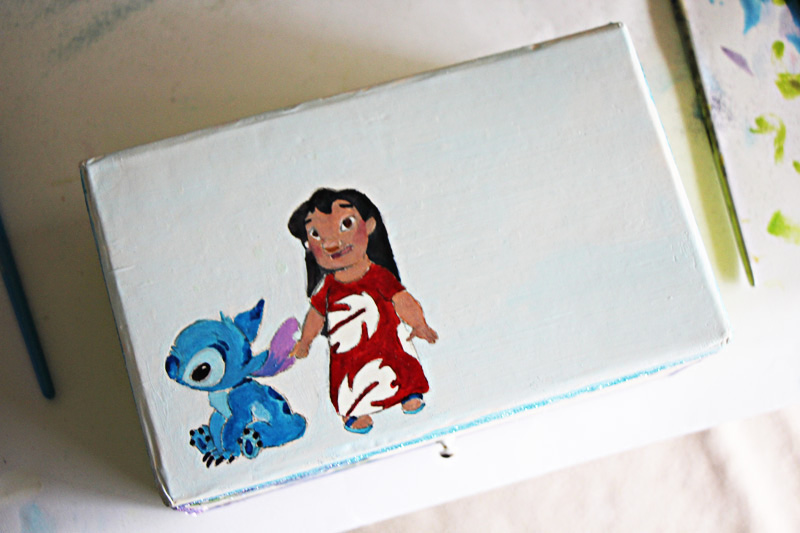
Lilo and Stitch Repainted Jewellery Box!

Jewellery Box Repaint! Lilo and Stitch!

 By Natalie Wyatt


Aloha!

This past week, I have been super busy doing the biggest clean up of my room. I decided it was about time...

It was been really rewarding! Everything is beautiful again and clutter free! And no more spiders under my bed... *shiver*. Plus I found $80 and an $150 gift voucher!

Anyway! I have had this Jewellery box for a while now and it was looking a bit old and dated, so I had thrown it in the pile to give away, but then I looked at it through DIY eyes and saw an opportunity! So I've created his little tutorial on how I re-painted my jewellery box!


Materials:
  • Gesso (Or an alternative primer)
  • Schmincke Aerocolors: 101, 202, 304, 405, 602, 701.
  • Craft Glue
  • Nice Pattern Paper (To line the bottom)
  • Tape
  • Scissors
  • Glitter
  • Pencil
  • Rubber
  • Paintbrushes
  • Glass of Water
  • Scrap Paper 
  • Palette for Blending


So I gave my jewellery box a good clean so it was ready to be painted. I used some scrap paper underneath to protect the desk.


I used the masking tape to tape the edges of the mirror, to prevent paint getting on the mirror.


I applied my first coat of Gesso to the top and edges of the jewellery box. 


I also pulled out the bottom drawer to paint. (I didn't paint the back edge because you won't see that once the drawer is back in place). While resting them, I placed them on top of small blocks to stop the paint sticking to the paper.

When the first coat was dry, I applied a second (lighter coat) and left it overnight to dry fully. In the morning I then put the drawer back into the jewellery box.


The beauty of gesso paint is it dries fairly quickly and is able to be drawn on and even worked on with an eraser.


I first started by drawing out a sketch of Stitch.


I then added Lilo. These were freehand drawn. 


And then of course, I added Ohana to the front edge because that's pretty much the whole movie theme!


I used the Aerocolor paints to decorate my jewellery box. I got these in a set, the Roland Kuck Fantasy set. The codes from left to right: 405, 202, 304, 101, 701, 602.


And then of course, my trusty steeds.


I used this plastic palette to mix my colours. The Aero Colors come with very handy eye dropper tool applicators, which mean that you don't waste your paint!


I painted my first layer on Stitch, I used the Blue and White to create these colours.


Adding some more details.


I used the Black for the eyes and then the ear were varying combinations of the Blue, Pink and White.


The skin colour was tricky, but I used a small amount of the Pink, Yellow, White and a dash of  Blue. The photo's make the paint look grainier than they did in reality.


For the dress, I used Pink and Yellow. 
For the cheeks and mouth, I used the Pink and White.
For the hair, I used the Black. 
And Blue and White on the feet. 


I used the plain blue for the writing. 
I laden my brush rather heavily so I could get the light and shade in the writing. 


Ohana!

TIP: When using your pencil, use a light shade like 2H, (unlike what I used in this tutorial) this will stop the paint from mixing with the lead and becoming dirty.


Flower with a Blue and White base.


Added some darker blue, with a hint of Pink.


Glitter time! I shook the packets of glitter over the wet painted areas and sometimes, used a dry paint brush to apply. Try and apply the glitter while the paint is wet.


Wasn't liking how this flower was going, but glitter solves everything! Made some Purple paint with the Blue, White and Pink


Added in the leaves.


Outlined the flower and added some Yellow to the leaves.


I made this Green with Yellow and a touch of Blue.


You can't see very well here, but I added some green glitter over the paint.


And repeated around the other sides of the box.


I then painted a Light Blue colour from the Blue and White and added some blue glitter! I followed this around the whole box.


Added a Purple strip around the front of the box.


I then painted a very light Bluish White to the top of the box. I used a very fine brush to paint around Lilo and Stitch.


I had painted Gesso on the edges of the mirror and now I painted it Purple. This was a mix of Blue, Pink and White.


I then took away the sticky tape. (Just be careful what tape you use, because you might be left with sticky marks). Which you can clean off with Eucalyptus oil.


I cut out a piece of sparkly paper to stick to the bottom of my jewellery box. 


I used Craft glue, which I bought from Spotlight.
 

Ta-da! It covered up some yucky marks, which was great!


I then used a fine-liner pen to add details to Lilo and Stitch.


Finito!


It sparkles very nicely in real life!

~

Find us on Facebook:
Instagram: @mepxymarkers
_________________________
Please send us your work or anything that you create! Thanks for watching!

 
Natalie Wyatt
Instagram: @artbynataliebeth