Showing posts with label Natalie Beth. Show all posts

Wednesday, 9 December 2015

Christmas Gifts with Pebeo Porcelaine 150!

Christmas Gifts!

Made with Pebeo Porcelaine 150 Paints and Markers


Every year, I have the same dilemma trying to decide what to get for my Grandparents as they always tell me that they have everything that they need. And every year I end up doing a painting or drawing for them, this year however, I thought I'd make something that they might actually use!

I decided to test out my paints and try my hand at more realistic and detailed designs.
Unfortunately, I didn't take photographs of the steps, but I'll do my best to explain them.


The Pebeo paints work in a similar way to most paints when it comes to mixing colours. I used a scrap of paper to mix the extra colours. I sometimes mixed the marker paints, or the pots of paint, or a mixture of both, which I will go on to explain.


In my blue butterfly and red robin painting, I used Princeton brushes, which work a treat! 


  • In this painting, I started off by drawing the outline of the butterfly shape.
  • Once, I had done this, I then drew the shapes on the wings.
  • I also filled in the edges, but left some white gaps on the tips of the wings for the spots.
  • I then drew the body of the butterfly.
  • I left this to dry for a couple of minutes.
  • I then started off with yellow and drew some of the colour on the outer edges of the shapes.
  • Next, I used my orange a bit further in, next to the yellow.
  • Occasionally I would go back to my first colour to create a bit of a gradient.
  • However, be careful in doing this as sometimes the paint can be lifted up if overworked.
  • Then I used the red in the middle for some warmth.
  • Once the butterfly had dried a bit more, I got my two white and black pots of paint and mixed a grey colour on my paper which I then painted with a brush underneath the butterfly as a shadow.
  • I had to do two coats of the paint with a fairly laden brush to get the even grey colour.


Colours used:
Agate orange.
Marseille yellow.
Scarlet red.
Anthracite black.


  •  For this butterfly, I began by using the black marker and outlining the shape of the butterfly.
  • I then filled in the shapes on the wings and drew the butterfly body.
  • Once this had dried I used the dark blue marker and coloured the edges of the shapes.
    • I shaded by finishing the line on a curve. By this I mean that I finished the colour with a curved line instead of a flat edge to join the next colour nicer.
  • I then used by pale blue colour to finish colouring in the wings.
  • I then pressed the nib of the light blue marker a couple of times on a piece of paper so some of the paint flooded onto the paper which I then mixed with white potted paint to create a light blue colour.
    • This colour I then painted as a highlight and third colour on the inside of the wings.
  • I also used it again to paint spots on the outer edges of the wings.


Colours used: 
Lapis Blue.
Peacock Blue.
Anthracite Black.


  • This bird looks really tricky, but it was just experimental and a lot of fun! And I only used a couple of colours.
  • Firstly, I used the red marker to draw the shape of the bird. I used the marker when it didn't have a lot of paint in the nib so it would draw lightly.
  • I then used my brushes to do some of the red brush strokes ontop of the head and chest.
  • While it was still wet, I used my yellow paint to add some highlights.
    • I also mixed some of the red and yellow together on the paper to make orange and painted that as well.
  • Next I painted the eye which was done just using the black and leaving a space for the eye reflection.
  • Then I mixed some of my blue and black together to make the colour for the wings.
    • I painted keeping in mind the direction and shape of the feathers and built the paint up in layers. Sometimes I had to wait for the paint to dry before adding the next layer.
  • Then I painted the beak which was made from mostly black with a little blue and then shaded around the eye and at the back of the head.
  • Then I mixed red with a little blue to make a purple colour which I painted on the chest of the bird below the beak.
  • After this had dried I painted the background which was purple made from the blue and red.
    • For this I painted in stages following the direction of the bowl and added white each time to create the gradient. (You can see my brushstrokes).
  • Voila!


Colours used:
Scarlet red.
Citrine yellow.
Lapis Blue.
Ivory.
Anthracite black.


All of these were left to dry overnight and then baked in a normal oven at 150 degrees for 35 minutes.
The paint is now washable. However, it is recommended to hand-wash to preserve the quality of the paint. If however you must use a dishwasher, use it on Eco mode. :)


Paints are available at Spotlight stores around Australia and selected art stores!

~
Find us on Facebook:
Instagram: @mepxymarkers
_________________________
Please send us your work or anything that you create! Thanks for watching!
 
Natalie Wyatt

Saturday, 21 November 2015

Christmas Wreath Card!

Christmas Wreath Card

Made with Mepxy Markers


I may be in denial that Christmas is so soon as there is a lot to do! But truth be told, Christmas is probably my favourite time of year. So I thought making some Christmas themed cards would be the way to go!

These are so simple to make and you can use any Mepxy Markers that you have on hand!


Materials
  • Mepxy Markers:
    • R59
    • W07
    • W29
    • L63
    • L67
    • C99
    • L05
  • Blank Card 
  • Pencil
  • Pentel Gold Brush Pen

I bought a pack of blank cards from a paper store nearby, but you can make them easily enough from any type of paper.


First, I did a rough sketch of the size of the wreath and baubles.


I drew a mix of leaves and berries and continued around the wreath.
I found that turning the drawing helped keep the wreath shape looking like it was following a path around the shape.


Here is the finished product. I added a bow as well for a Christmas-sy touch!


Photograph of the drawing.


First, I started with L05 Elm Green and shaded in the spindly leaves. This helps you see the type of leaves I drew. The pencil also helps stop the bleed of the markers, it fills the shapes really well!
You'll just have to make sure you use paper that is thick enough to not bleed the markers through to the next page. If you are unsure, slip a scrap of paper in the middle so it catches any bleeding.


Here you can particularly see how the markers fill out the shapes really well. Here I used L63 Forrest Green.


Here I added some darker green tones with C99 Pine Needle.


Now I used R59 Cardinal to shade in the berries.


Using my three greens from earlier I filled in the gaps of the wreath and also added some line work to the leaves by shading the stems of the leaves.


Here I used W07 Light Mahogany and W29 Sienna to shade in the ribbon.


You can't see it very well in this scan, but I used my Pentel Gold Brush pen to shade in the baubles. It gives a great effect in real life as it shines when the light catches it. How Christmas-sy!?

You can buy these pens online.


Close up of the gold baubles.


Markers used in this tutorial.


Happy Christmas in advance! The cards are almost too good to give away!


Here's a card I made last year.


~
Find us on Facebook:
Instagram: @mepxymarkers
_________________________
Please send us your work or anything that you create! Thanks for watching!
 
Natalie Wyatt

Friday, 25 September 2015

Mepxy Marker - 2D Animation!

Mepxy Marker - 2D Animation

"Velma Pigglesworth goes to Africa"

For one of my assessment pieces at University last year, I wanted to make a 2D animation and decided to create one using the Mepxy Markers. 

I called it "Velma Pigglesworth Goes to Africa" which was a short animation of this crazy red haired girl taking photos of the animals she came across in her travels. It only went for 60 seconds, but was a lot of fun to make!

The animation included over 100 drawings which were created on Canson Bleedproof paper.


I started by ruling up 4 squares per page and then drew my sketch in pencil and then coloured using the Mepxy Markers and occasionally would finish with some pen detailing.


The markers I used for this work were: 
  • The Basic 36 Brush Marker set

  • The Pastel Design Marker set.

  • And the Tonal Grey Brush Marker set.


Here are some of the concept art drawings I created for the animation.

Originally, the animation was going to be about a giraffe called Gerald... or Jeffery? I can't remember. But this was a sketch I created of the said giraffe!

I wanted to try some thumbnail sketches of backgrounds and these were so much fun to create!

Creating Velma Pigglesworth.

 Looks like I gave her a swimsuit for the African Desert, guess I wasn't thinking practically ha-ha!

And here are some of the drawings I created for the animation:


My desk set-up!

Some of the first drawings.

Drawing the trees!

Velma being Velma!

The giraffe was probably my favourite character of them all!

 The Leopard! I felt like Cruella DeVille with all the spots.

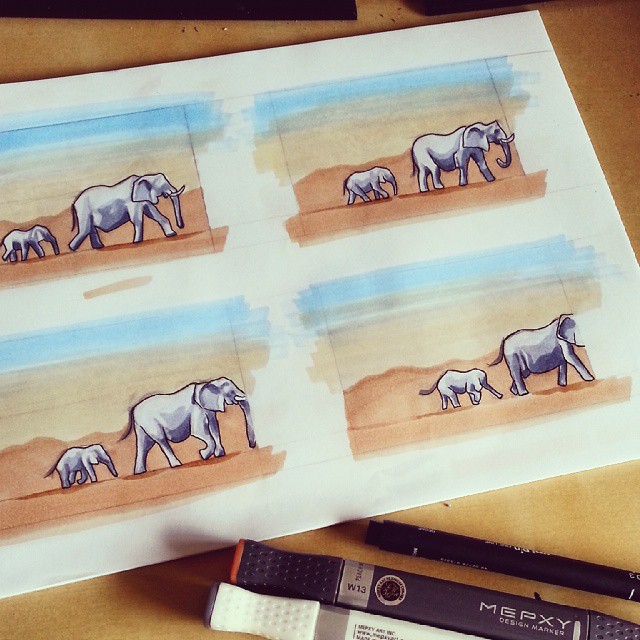
The Elephant and baby elephant which was so much fun to draw. 
You can see how I wasn't afraid to draw over the edge of the boundaries in the square  because I was going to crop it in the end.

More Elephants.

The Lion was a bit tricky to draw, but he was great in the end.

I used mainly three colours for the Elephants.

I had to extend the boundaries of my drawing in this one to get the detail in, but I just move the ratio of the squares.

The colours I used for the Gazelle.

All the drawings!

And now for the actual animation:


I used Adobe Flash, Final Cut X and GIMP to make the video.

Music is "Ah Zabenya" from The Lion King and "Sun" by "Jonsi".
Various sound effects were added in Final Cut X.

Hope you enjoyed this post!

~
Find us on Facebook:
Instagram: @mepxymarkers
_________________________
Please send us your work or anything that you create! Thanks for watching!
 
Natalie Wyatt