Showing posts with label Free Download. Show all posts

Sunday, 1 November 2015

"Sun n Moon" T Shirt Design

Hand-painted "Sun n Moon" T Shirt Design
All you need to create this gorgeous "Sun n Moon" T Shirt is:


Iron-on Image Transfer Sheets
  • White Top (wash and iron without fabric softeners before painting)
  • Black (or other colour of your choice) Pebeo Setaskrib Marker
  • Iron-on Image Transfer Sheets
  • Iron
  • Sun n Moon Design Download
  • Printer
Once you have downloaded the design, put an Image Transfer Sheet into your printer and print the design onto it.

Follow the instructions to iron your design onto your white top then colour with your Setaskrib Marker - that easy!


Transferred Design
Painted with Setaskrib Marker


Thursday, 1 October 2015

Paint Pretty, Purple, Pebeo Ponies


"Purple Ponies" Wind-cheater
You can create gorgeous hand-painted designs for your kids with Pebeo Setacolor fabric paints and markers like this cute "Purple Ponies" Wind-cheater. I've included a PDF of the design for you to down-load and colour.

Here's what I used for this project (You can really use whatever Pebeo Setacolour and Setaskrib you desire):


  • Basic plain colour wind-cheater (washed without fabric softeners and ironed)
  • Heat n Bond Ultrahold  double-sided adhesive webbing (above) or other similar product
  • A piece of plain, thin, white poly-cotton fabric (I actually used the back of an old pillow slip) make sure your fabric is washed (without fabric softeners) and ironed before starting.
  • Pencil for tracing
  • Pebeo Setacolor Opaque colours, I used Light Green, White, Bengal Pink, Garnet Red, Parma Violet, Butter Cup, Cornflower
  • Pebeo Setaskrib Markers, I used all the colours from the fluro set (Pink, Yellow, Green, Purple, Blue, orange) and Blue, Green, Yellow, Blue and Black from the basics set
  • Small round brushes, and one flat angled brush about 1cm wide
  • Pretty Ponies design download
  • Printer (to print the design)
  • Iron to fix the paint when finished
My Pretty Ponies design was inspired by some artwork I did quite a while ago.

My inspiration
I have included it so you can have another reference for colours and shading, but really use your imagination and have fun. 

To begin the project download the design and print it up. Place your white poly-cotton fabric over the top of the print. The fabric should be thin enough to see the design right through and you can trace it with a pencil.
Design traced onto fabric
Once you have the design traced onto the fabric, go over the outlines with the markers. Don't worry about the colours being exact, use as close as you have, the Opaque paints will cover the lines.


Now have fun painting! You can mix the paints together to get a variety of colours and for shading. Mix them on your pallet or blend together on the fabric whilst they are still wet. 


You can use both paints and the markers to colour...


Use a small round brush for finer details and your flat brush for bigger areas...


Here I decided to add a butterfly. You can see where I practiced drawing it on the outside of the design, then I just drew it in with a pencil. 


I then went over the butterfly with white Setacolour paint. This help the butterfly "pop" out from the page when I colour it. The Sun was done using the Setaskrib Fluro Markers. Look how beautifully the blend.


Here is my finished design...

Now it time to use you iron to set the fabric paint. As per instructions on the packaging, you will need to iron for about 5 minutes.  Then take your Heat n Bond (or other double-sided webbing)  and follow the instructions to adhere your design to your wind-cheater.


Ta Da! It's done!

Monday, 6 July 2015

Mix Media Goddess Holiday Project


This may look like a difficult exercise but it's actually isn't, and I think creating a Goddess portrait is an inspriring holiday project for any gal, from pre-teen to whenever. Most of this project can be done with stencils, although you could decorate with your own doodles if you wish AND I have included a PDF for you to download if you prefer to trace my goddess face.

When it comes to materials, really the options are limitless. If you have been following other Crafty Crusaders blogs and trying out some of our awesome projects then you would already have a collection of Pebeo Fabric, Porcelain and Glass paints and for this reason I am using these materials extensively through-out because I want to show you they are not just for craft - you can create a beautiful mixed media painting with them as well. A mixed media project like this is a great way to use up whatever products you have on hand.

Here is a basic materials list:
  • 16 X 16 inch Wood Painting Panel (you could use a stretched canvas but you may get slightly different results)
  • Clear Gesso
  • Graphite pencil and fine ball point pen for tracing
  • Scotch Blue Painters Tape (available from hardware stores)
  • Selection of stencils (I really recommend collecting stencils if you like doing craft or creative projects but if you don't have them - decorate your sections free hand).
  • Selection of Acrylic paints, including Pebeo Setacolour Opaque Fabric Paints, Pebeo Vitrea 160 Glass Paints and Pebeo Porcelaine 150 paints. 
  • Pebeo Porcelaine 150 in Gold
  • Pebeo Vitrea 160 Iridescent Medium
  • Selection of paint markers as above, as well as other brands such as Posca and Molotow. 
  • White Paint Pen
  • Schmincke Aero Color Ink in Brazil Brown
  • Small round paint brushes
This was very experimental for me as I chose to work on a wood panel which I never have before and I didn't know how the materials I was using would react, but let me show you how it went...

Firstly, download a PDF of the Goddess here if you wish to trace it and I will show you how to copy it on to your substrate. Of course, alternatively you can draw your own.

Step 1. I used a 16 X 16 inch Wood Painting Panel available from art shops. Because I wasn't sure what I would do with at first, I covered with a coat of clear gesso. To be honest I am not sure what difference this would make to the rest of the process, but on the packaging it suggests to coat the panel with gesso primer so I did.

Step 2: If you are drawing your own Goddess, go ahead and do it in your preferred manner. If you are using my Goddess, make sure you have downloaded and printed a copy from this link. Print the PDF on normal copy paper A4 size from your printer. You need to colour the BACK of your photocopy, covering the lines you wish to trace with GRAPHITE. I used a Graphitint pencil so that the colour was different and you could see it. Then place the photocopy onto your panel in the desired position with the graphite side down. Now use your ball point pen to trace over the lines. The pressure of the pen will transfer the graphite onto the wooden panel. (Note you can see where I have coloured in with graphite because I am using my own tracing on transparent paper - you won't see this if you are using a photocopy).


It may be faint at first, if so go over the lines with your graphite pencil so you can see them clearly. You may need to add a little extra to the tracing in the shoulder and body area to take up the space if you panel is the same size as mine.


Step 3: This is one of my favourite techniques. Use Scotch Blue painters tape to mask out some straight lines and create "sections" to work in.


Step 4: Now you want to take your stencils and place a separate design in each section. I recommend  sticking to a similar family (such as blue, green and yellow) and one contrasting colour (such as shades of purple). The fun is in experimenting and creating for yourself, but so you have an idea I will give a bit of explanation for how I created each of my sections.


Section 1: First I stencilled using Pebeo Vitrea 160 Marker in Turquoise as below.

section 1
Then I painted over the whole section in Pebeo Vitrea 150 glass paint in Anise. Once that was dry I stencilled in the butterflies using Pebeo Setacolor Opaque fabric paint in Garnet Red.


Section 2: I first painted a rainbow with Pebeo Vitra 150 in Amaranto, Azure and Anise...

Section 2 and 3
Then once dry I stencilled over the top with a colour made from a mix of Setacolour paint in Buttercup and Vitrea 160 in Azure.

Section 3: First stencil with Pebeo Porcelaine 150 in Parma Violet. Use a marker, or the paint with a fine brush to touch up where necessary. When dry, the background is then painted with Setacolour Opaque in Oriental Blue.

Section 4: For this section I painted the solid colour first using Pebeo Setacolour opaque fabric paint in Light Green. once dry I stencilled over the top with Pebeo Porcelaine 150 paint in Lapis Blue.
section 4
Section 5: The background was done first blending the Setacolor Opaque paint in Cornflower, with the translucent Vitrea paint in Parma Violet. The stencilling over the top is in that same beautiful Olive Green colour I mixed my self using Setacolour Buttercup and Vitrea Azure (a yellow and a blue).

Section 6: For this stencil I used Pebeo SetaSkrib markers in Light Blue and Purple to do the stencil, then painted in the background carefully with a small round brush and Setacolour Opaque in Buttercup.

Section 7: Solid colour painted first, Setacolour Oriental Blue, stencil and Setacolour Opaque in Buttercup.
Sections 6, 7 and 1
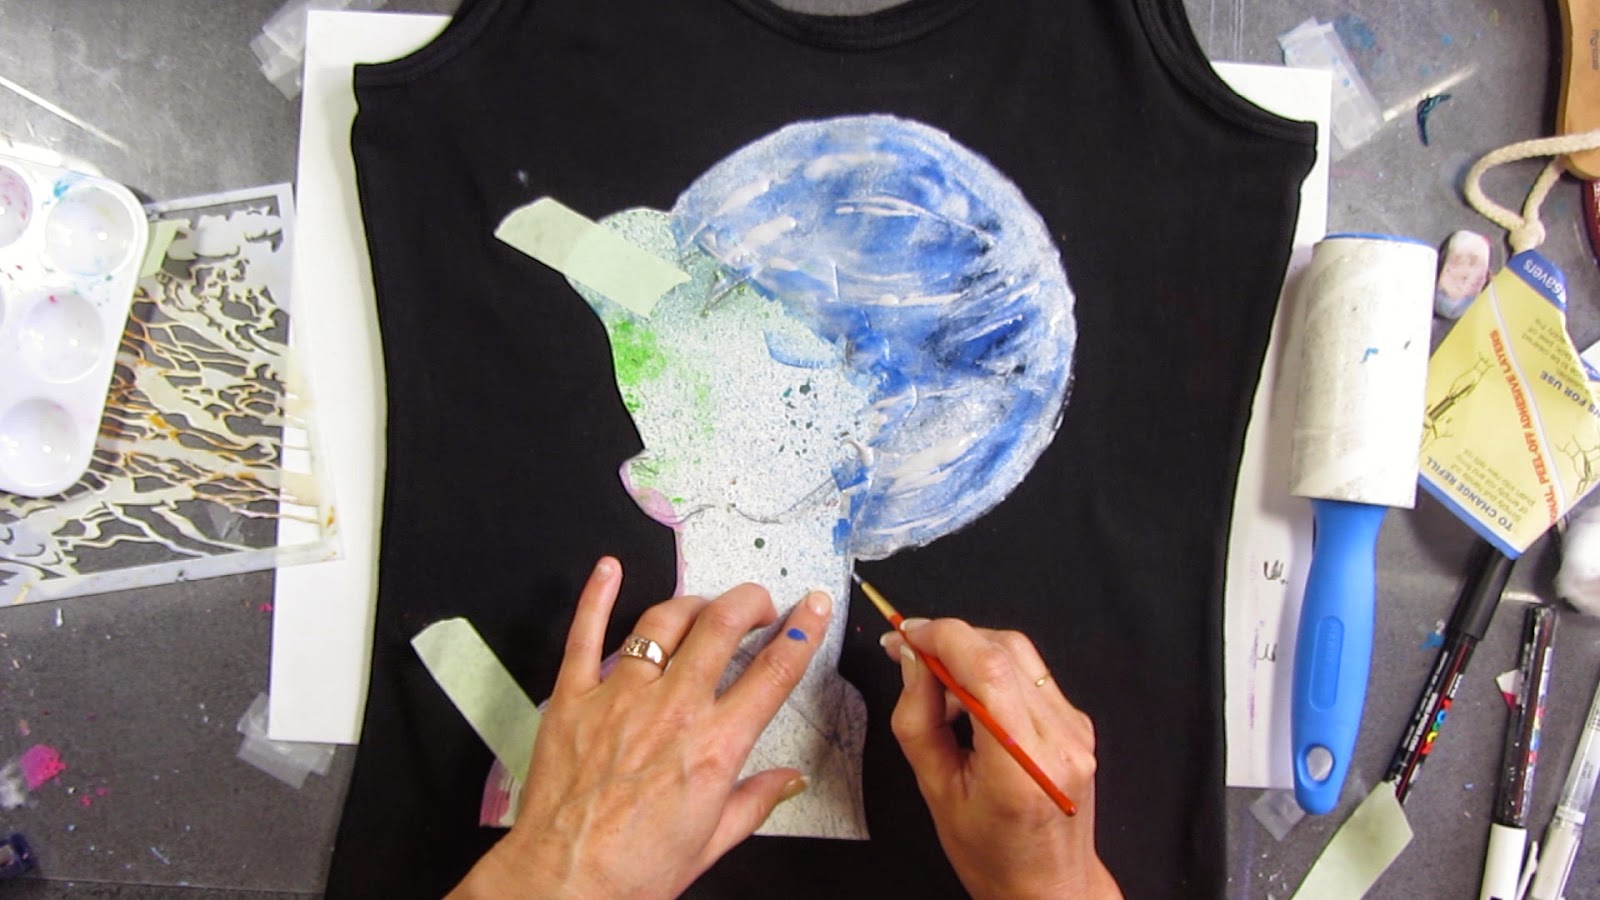
Step 5: Once you are happy with the major work done in each section you can take off your painters tape. I then painted in my Goddess with Gesso. Once painted I redefined the lines I needed with a pencil.

Gesso your Goddess and redefine your lines. 
Step 6: Experimental art often leads to mistakes, which can lead to important lessons and sometimes blessing in disguise. To paint in my Goddesses dress I originally used a combination of Pebeo Vitrea 160 Iridescent Medium with Setacolour Opaque in Buttercup on top of Gesso that wasn't completely dry and the three products just didn't mix together and started peeling off. Lucky I was able to scrape most of it off with a paint scraper.

Goddess Dress scraped back.
I then went over it again this time using the Vitrea 160 iridescent medium with virtue 160 paints in Lemon and Brilliant White. I love that the wood grain showed through and I also got some really interesting texture because of the few bits of underpainting that weren't completely scraped off.

New Goddess Dress
Step 7: The colours I have used to create the hair are Pebeo Porcelaine 150 in Gold (look how beautifully in shines in the light) and Scarlet Red. The two colours will blend in beautifully on the substrate whilst they are still wet so you can creates tones of Gold, Red and Rose Gold.

The skin colour was created using a mix of Pebeo Porcelaine 150 paints in Ivory and a just touch of Scarlet Red and Gold. To get the darker shading I added a touch more red to the mix.

For the lips, Red SetaSrib marker, and the eyes Vitrea 160 Marker in Amber. Use a black Setaskrib for the pupil (don't forget to leave a white highlight for sparkling eyes) and to define the eyes and the eyelashes. I used a white paint pen to  add the white highlight in the pupil and the white of the eyes.

I also added a white hi-light to the bottom lip, and some dots on her cheeks for magical sparkle.

I used the the Vitrea Amber marker to draw a defining line around around my Goddess and drew in features such as the nostrils. 

I used red and Gold for the bird, but this could be anything you like.

Steps 7 and 8
Step 8: Once you have completed your Goddess its time to take a collection of paint markers, you can use the Porcleaine, Glass and Fabric markers you have in addition to any paint pens such as POSCA and MOLOTOW to add the little details you can see in each section. The Opaque Paint pens are also fantastic for covering up messy bits you don't like and fixing up mistakes!

Step 9: Use a circle template (a plate is as good as anything - its just about finding the right size) to mark in your pendant. I then used dots of red, white and gold paint pens to represent the chain. The word "Goddess" is written in red paint pen.


Step 10: Finally I decided try try and accentuate the woodgrain feel by using Schmincke Aero Colour Ink in Brown Brazil to stain the blank spaces. I love this look, but it's optional of course. You could also paint the sides of  your wood panel to match.

Done and ready to hang!

Sunday, 12 April 2015

Paint Your Own Tank Top With Pebeo Setacolor Fabric Paint


Here's what you will need to paint this Tank Top:
  • Black Tank Top (or T Shirt if your prefer). Mine is 95% cotton, 5% elastane. Look for a smooth rather than a ribbed fabric.
  • Pebeo Setacolor Opaque fabric paint in "Shimmer Silver"
  • Pebeo Setacolor Thickener
  • Pebeo Setacolor Opaque fabric paint in "Cornflower"
  • Pebeo SetaSkrib Markers in Blue and Black
  • Paint brushes, one flat, one small round, I used Princeton brushes.
  • Heavy paper to place inside your Tank Top so paint doesn't run through to back
  • Removable tape to secure your masks to your Tank Top
  • Lint Roller (or other tool to remove lint)
To make a moon stencil:
  • A4 size craft foam sheet (Or even heavy cardboard would be ok)
  • Plate or circle template
  • Craft knife and mat
To make Moon Gazer mask:
  • Print up template provided (computer and printer required)
  • Piece of heavy paper (185 - 300 gsm would be OK)
  • Heavy Gloss Gel
  • Old paint brush for Gel
  • Scissors
Here's what to do:
  • Firstly wash your top in a detergent that does not contain fabric softeners.

Make a circle stencil for your moon.
  • To make your moon stencil, you need to cut out a circle shape. I used a thin piece of craft foam, and a bread n butter plate. Place on a cutting mat, and cut around the plate with your craft knife. Keep both the stencil and the mask (the solid circle shape) as it might come in handy for another project
  • To make the Moon Gazer Mask, print up the template below.


  • Cut around the template and then draw around the edge of the template onto a piece of heavy paper. Cut the shape out and coat front and back with a couple of coats of heavy gloss gel (allowing to dry in-between coats and before turning over). This will make your mask strong and durable and resistant to damage from paint and other liquids. I've used my mask in many projects like the paintings below,  and its still standing up well.

  • Next take some heavy paper (I used old card stock) and insert inside your top between the front and the back, you don't want any paint to seep through onto the back of your top.
  • Use your Lint Roller to remove any lint/fluff from your top
  • Then place your moon gazer mask and your circle stencil on your top as shown, securing in place with some removable tape.

    • Prepare your paint by mixing about 3 parts Pebeo Setacolor Opaque Silver Shimmer, with 1 part Pebeo Setacolor Thickener. I did this to make the paint thick to lesson the chance of the paint seeping under my mask/stencil


    • Carefully paint inside you moon stencil. Paint in the direction starting outside the stencil moving inwards.
    Add your blue paint
    • Begin to randomly mix in Pebeo Setacolor in Cornflower. You can also leave a little black showing for extra colour variation.

    • Use a thin Princeton brush to add curved silver lines to help give the impression of a sphere and also add texture.

    • Remove moon stencil carefully, and trace around the edge of the moon gazer mask using a fine brush


    • Touch up any edges with a fine brush


    • I used a wider brush to paint in the hair, adding some silver and some blue paint.


    Add blue to the hair

    add the stars (optional)


    Here I am using the SetaSkrib marker in Black to go over where my silver paint when wonky and neaten up my lines.

    She's done. Don't forget to iron your top for 5 minutes as per instructions on the bottle to set the paint.

    Wednesday, 18 March 2015

    "Rise From the Sea" Glass Plate ~ Pebeo Vitrea 160 with Michelle


    "Rise from the Sea" ~ Pebeo Glass Painting with Vitrea 160

    I am loving the chance to explore all these new mediums with the Crafty Crusaders Design Team!!
    I have loved everything so far and these Pebeo Vitrea 160 Glass Paints are no exception.
    This was so much fun and so easy to create! You really are only limited by your imagination and if imagination is a problem there are so many different designs out there and online to inspire you.
    I have drawn this design from scratch that you will be able to download and printp out too. I have left sections in this plate design clear, I like how it changes the look of the plate depending on the background that it is sitting on. When I finished this design it reminded me of elements from the sea, turned different ways I could see a turtle, starfish and octopus legs and then the yellow sections remind me of the sun, so rise from the sea it is! LOL


    *****TIP*****
    When you are working with new mediums and colours for the first time, a handy tip I find helps me to get to know my colours and mediums is to create a colour template.
    If you create it on a piece of acetate you can place it over different things to see how the colours look next to each other. Paint your mediums on the acetate over a piece of white paper. I store them by hole punching the acetate and adding it into a ring binder folder with the white paper in-between.
    Don't forget to name the colours as you go so you can easily find what you are looking for.

    Colour Template on an Acetate sheet.
     With the Acetate over Grey paper to see how they change with different colours.


    Now for the fun part lets make a pretty plate....
     Step 1: Draw a design that you want to use. I started with 2 circles and then drew 4 squiggly patterns to go out to the corners of the plate. Add some lines and circles and overlap patterns as you go.

    Step 2: You can use a black pen to draw your design then use a white out pen to change some of the overlapping lines.

     You can download a PDF of this template to use HERE


    Step 3: Outline the back of your plate design with the Vitrea 160 Black Pen. Because my plate is slightly curved I have a piece of foam under the plate to hold the pattern against the class, I have also used a little double sided tape to hold it in place.

    Step 4: Go back over some of the lines if needed with the black.


    Once you are happy with your design you can start colouring it in, :)


    Step 5: Apply the Azure Blue to the section below. I found it easier to add blobs of the paint by pressing the end down and then spreading out the colour.

    *****TIP*****
    If you want to experiment with colours before trying it on your glass products you can place a piece of acetate over the design and play with different colours first.
    Step 6: Using the Vitrea 160 pens, Apply the Turquoise to outline the other pattern then colour in with the Sandlewood Green.
    I have also applied the Sandlewood Green to the small sections outside the center circle.
    Apply the Aniseed Green to the spots and 4 leaf shapes around the middle.
    Then apply the Citron Yellow to the center pieces and the outside shapes.
    The rest is left clear at this stage.


     Step 7: Using the Brilliant 20 Veil White apply over the aniseed green with a brush on the dots & leaf pattern to make them less transparent and to make the colour more vibrant. Also apply white over the small circles down the pattern.

    Step 8: Brush a little of the white over the yellow from the center out to add a variegated colour from opaque to transparent. this gives the colouring more depth too. I also applied white around the yellow outlines and in the center line patterns.


    Step 9: I then decided to cover the blue center pattern with the white to make it more opaque and to make the colour pop a little more.
     

    Step 10: I applied the Aniseed green to the outside edge frame and also added white over that.


    Step 11: Leave to fully dry in minimum 24 hours then bake in an oven for 40 minutes at 160°C (325°F) (steady temperature) Place in a cold oven then when the temperature reaches 160°C bake for 40min then leave to cool in the oven. Is Dishwasher safe, washed on economy.

    Love the effect it has up against natural light :)
    Thanks for Looking xx