Showing posts with label home-made. Show all posts

Wednesday, 1 July 2015

Easy, Fun, Paint and Sew An Owl with Pebeo Fabric Paints and Markers


If you are looking for a fun project to try over the school holidays, why not try a paint and sew project? It's not only fun, the results are adorable and you can teach the kids some practical sewing skills such as sewing on buttons and basic stitches.

Here is a list of what I used for my project, but you could adapt using whatever you have and choose you own colour scheme.

  • 20 X 25cm stretched canvas (choose the box shape with thick edges so you can easily hang your project when finished.) I recycled an old canvas from a previous project I no longer required - I just painted over it with black gesso.
  • Owl Stencil, you don't have to choose an owl, there are plenty of different stencils available in craft shops. You can always draw your design free-hand, but I think stencils make things easier and more fun for kids.
  • Piece of calico or white cotton fabric big enough to paint your stencil on.
  • Fabric trims, buttons etc 
  • Embroidery strands for decorative stitching 
  • Printed felt piece (mine was from Spotlight)
  • A selection of Pebeo SetaSkrib markers and fabric paints. I used light blue and dark blue markers, light green and dark green markers,  orange and black markers and white Pebeo Setacolour Opaque fabric paint.
  • Small round paintbrush (if using fabric paints)
  • Tapestry needle (or similar)
  • General sewing thread (to sew on trim and buttons)
  • Spray adhesive.
Step 1. To start with choose your canvas. You can buy a new one and leave it unpainted, paint in the colour of your choice, or like me recycle an old canvas thats no longer required.

Step 2: Iron your calico and fabric and begin by tracing your stencil, I use the black setaskrib marker.
Step 3: Now is the fun part - getting to colour in your stencil! The first thing I did was fill in the black lines to make them solid. It's easier to colour in if you have "sections" to work on. For the Beak I used an orange Pebeo SetaSkrib marker. For the body I used a combination of light blue and dark blue SetaSkrib markers. You will find that the colours will blend in together on the fabric if they are still wet which creates a really nice shading effect and gives dimension to your painting. Start by doing a line of dark blue on the outide, the go over it with the light blue. Practice on a scrap bit of scrap fabric to see how it works. I did the same on the feet using light and dark green SetaSrib markers. For the eyes I used white Pebeo Setacolour Opaque paint and a small round brush.

Step 4: For the head I used my light and dark green markers again a drew in some parallel lines for an interesting effect.
Step 5: The wings were done by overlapping bands of colour, light green and light blue markers. Its fun to blend the colours together, but its a good idea to test out the colours first on a scrap, as blending the wrong two colours together could end up making a muddy unattractive colour!
Step 6: Added some white dots on the wings with the white seta colour fabric paint to make them look "feathery".
Step 7: This is an optional part, but a fun way to teach your child to sew on buttons. I used a couple from my stash of oddments, but there are plenty of really cool buttons around.
Step 8: I used a tapestry needle and some orange embroidery strands to do some basic decorative stitching. You could take this as far as you like it you know embroidery stitches, but I kept it very basic. 
Step 9: Once you are happy with your finished design trim it down to a size that looks right. Remembering you want to leave room for a trim and also be able to see your printed felt underneath. I first used a tacking stitch to attach my design on to the felt. Then I pinned my fabric trim on to cover the tacking stitch (no need to remove it) and the raw edge of the calico. I used general sewing thread to hand stitch my trim on. (You could machine this if you have one). I used white thread and was careful to bring my stitches in and out on the white lines of the trim - which made my stitches invisible. I did this on both the inside and outside lines of the trim. How you attach yours will depend on the style of trim you choose...
Step 10. Trim your felt down to the right size to fit on your canvas. Use a spray adhesive to attach the felt to the canvas. Follow the instructions for your adhesive, but generally, you spray both surfaces, wait a minute or so for the glue to become tacky, then press the surfaces together for a permanent bond. Now hang it up to enjoy!
Done!


Friday, 26 June 2015

Little Tiles Of Inspiration With Pebeo Porcelaine 150


These days everybody needs a little daily dose of inspiration, and this a cute and decorative way to get yours, or give some to a friend.

To make a Tile of Inspiration you will need:

  • Ceramic Tiles -  approximately 9cm square (I bought mine at Spotlight in the craft section))

  • Pebeo Porcelaine 150 Black Fine Liner Marker
  • Your choice of colours - Pebeo Porcelaine 150 Porcelaine Paints and Markers,
  • Flat and small round Princeton Brushes
  • Diggers Isopropyl Alcohol
  • A little mini easel to display (You can often buy these at craft stores, usually with a little mini stretched canvas)
I started by taking three different tiles and painting the upper two thirds with a mix of Pebeo Porcelaine 150 Ivory and Lapis Blue to make a sky colour. I used a soft, flat Princeton brush. I then took a small round Princeton brush an and experimented with brush strokes to create grass on the bottom third. The grass colour is Pebeo Porcelaine 150 Olivine Green.


On the above tile I went back in after the sky had dried with Isopropyl Alcohol and a cotton wool ball to remove some of the paint and create a cloud effect.

To draw my flowers I used Pebeo Porcelaine 150 in Parma Violet and dabbed the paint with a round brush.  Then I added the dots with a Pebeo Porcelaine 150 marker in Marseille Yellow. Make sure you let the paint dry between the layers.


For my Poppies tile I used the Pebeo Porcelaine 150 Marker in Scarlet Red to draw random poppy shapes, then the Pebeo Porcelaine 150 Black Fine Line Marker for the middle and the stems.


Again in the above tile I used the Black Fine Liner to mark in my flower outline. then I coloured in using Pebeo Porcelain 150 Marker in Amazonite Green for the leaves and a mix of Marseille Yellow and Agate Orange markers for the petals.

All the text was written with the Pebeo Porcelaine 150 Black Fine Liner. The options for colours, patterns, and quotes is endless, have fun exploring and creating something to inspire you every day.

Sunday, 24 May 2015

The beauty of Schmincke AeroColors for Card Making!

Hi There, Siann here again to show you the fun I have had with the Schmincke AeroColor Inks with my card making.  The beauty and vibrancy of these inks make them such fun to play with.
Below is my tutorial I put together on how well Schmincke helped me reclaim some unused Christmas cards.


Check out How to Create Homemade Recycled Gift Cards by Siann Watts on Snapguide.

Sunday, 26 April 2015

Baby Mermaid Library Bag


My Baby Mermaid Library Bag (although you could could use it for many purposes) actually began because I didn't want to waste the left over Pebeo Setacolor paint I had been using on another project. Here's what happened...

  • I had left over Pebeo Setacolor Opaque fabric paint in Oriental Blue, Light Green and Butter Cup
  • I grabbed a piece of washed (without fabric softeners) and ironed cotton "Homespun" craft fabric
  • I added some water and swished it on randomly - just to see what would happen.
  •  I was happy with this result, and it reminded me of a water scene, and of course MERMAIDS
  • So I grabbed a Pebeo SetaSkrib marker pen and marked in the basic shapes of my baby mermaid.
  • The basic shapes to draw to start off your mermaid are a circle for the face, a football shape for the body, and a triangle for the tail - it can be that simple.
  • Once you have drawn in your shapes with the marker, begin to fill them in with Pebeo Setacolor Fabric paint. I mixed together White and Bengal Pink to make the face and Used the Bengal pink on its own for the body and tail.

I used a heat dryer to spend up the paint trying so I could move on to the next layer.

  • Next I used a stencil and white fabric paint to add a pattern on the body. I used a Princeton Stencil brush at first, then a finer brush to make the white paint thicker around some edges to add shading and dimension

  • Add some detail on the tail with white paint

  • I used a mixture of Pebeo Setacolor in Parma Violet and White, with a fine brush and wavy strokes to create the hair (imagine hair floating about in water). I started the beginnings of my face as you can see. The neck is just a small line and the arms are simple stick arms and hands.

  • I love to add dots so I added swirls of white dots in the hair
Note how I have also added some Parma violet shading on the tail. You can also go over any of the colours as they dry to increase their intensity.

    The finished Baby Mermaid
  • Use a fine brush and/or Setaskrib markers to create facial details. Don't forget to add a dot of white paint for a hi-light in the pupil to give a "starry-eyed" look. Note also how I haven't outlined the bottom of the eye, this adds youth and whimsy to the face.
DON'T FORGET TO IRON YOUR DESIGN AS PER INSTRUCTION ON THE BOTTLE TO SET THE PAINT

Although my design had started just as a play on a piece of fabric, I ended up really liking it and wanting to use it in some way so I decided to make a simple children's library bag. Here's how I did it:
  • Cut a piece of cotton fabric to required size, mine is 35cm X 40 cm finished. My fabric is a remnant of uncoated curtain fabric.


  • As you can see in the above photo I cut a long piece of fabric so the bottom or the bag has a folded edge. BEFORE stitching up the side seams I have finished the top edge of my bag with my overlocker, and folded over a seam of about 3cm. This will create a casing to thread through a cord. You can see I have marked in a button hole. I actually did not sew the button hole in this position, as the hole would have ended up on the inside of the bag and I wanted it to be on the outside.

    Note the button hole is only sewn through one thickness of fabric (before the top edge is folded over)
  • Once you have sewn in your button hole, sew up your side seams, then fold over your casing and stitch in place. Press with your iron.
  • Next you will need to adhere your design to your bag. To do this you need a double sided adhesive web which you will be able to buy from a fabric and craft store. There are many varieties available but I used Heat - n -Bond Ultrahold. Follow the instructions on your product.
Here I have peeled off the backing on one side of the adhesive web and ironed it to the wrong side of my design. Next I will cut around the design, then I will peel off the paper backing and iron it to my bag while it is till out flat.
As a final touch I've used a bit of Dimensional Fabric Paint 

  • Once you have adhered your design, attach a safety pin to a piece of cord and thread through the casing. Going the cord together with your sewing machine and you are done.

Sunday, 12 April 2015

Paint Your Own Tank Top With Pebeo Setacolor Fabric Paint


Here's what you will need to paint this Tank Top:
  • Black Tank Top (or T Shirt if your prefer). Mine is 95% cotton, 5% elastane. Look for a smooth rather than a ribbed fabric.
  • Pebeo Setacolor Opaque fabric paint in "Shimmer Silver"
  • Pebeo Setacolor Thickener
  • Pebeo Setacolor Opaque fabric paint in "Cornflower"
  • Pebeo SetaSkrib Markers in Blue and Black
  • Paint brushes, one flat, one small round, I used Princeton brushes.
  • Heavy paper to place inside your Tank Top so paint doesn't run through to back
  • Removable tape to secure your masks to your Tank Top
  • Lint Roller (or other tool to remove lint)
To make a moon stencil:
  • A4 size craft foam sheet (Or even heavy cardboard would be ok)
  • Plate or circle template
  • Craft knife and mat
To make Moon Gazer mask:
  • Print up template provided (computer and printer required)
  • Piece of heavy paper (185 - 300 gsm would be OK)
  • Heavy Gloss Gel
  • Old paint brush for Gel
  • Scissors
Here's what to do:
  • Firstly wash your top in a detergent that does not contain fabric softeners.

Make a circle stencil for your moon.
  • To make your moon stencil, you need to cut out a circle shape. I used a thin piece of craft foam, and a bread n butter plate. Place on a cutting mat, and cut around the plate with your craft knife. Keep both the stencil and the mask (the solid circle shape) as it might come in handy for another project
  • To make the Moon Gazer Mask, print up the template below.


  • Cut around the template and then draw around the edge of the template onto a piece of heavy paper. Cut the shape out and coat front and back with a couple of coats of heavy gloss gel (allowing to dry in-between coats and before turning over). This will make your mask strong and durable and resistant to damage from paint and other liquids. I've used my mask in many projects like the paintings below,  and its still standing up well.

  • Next take some heavy paper (I used old card stock) and insert inside your top between the front and the back, you don't want any paint to seep through onto the back of your top.
  • Use your Lint Roller to remove any lint/fluff from your top
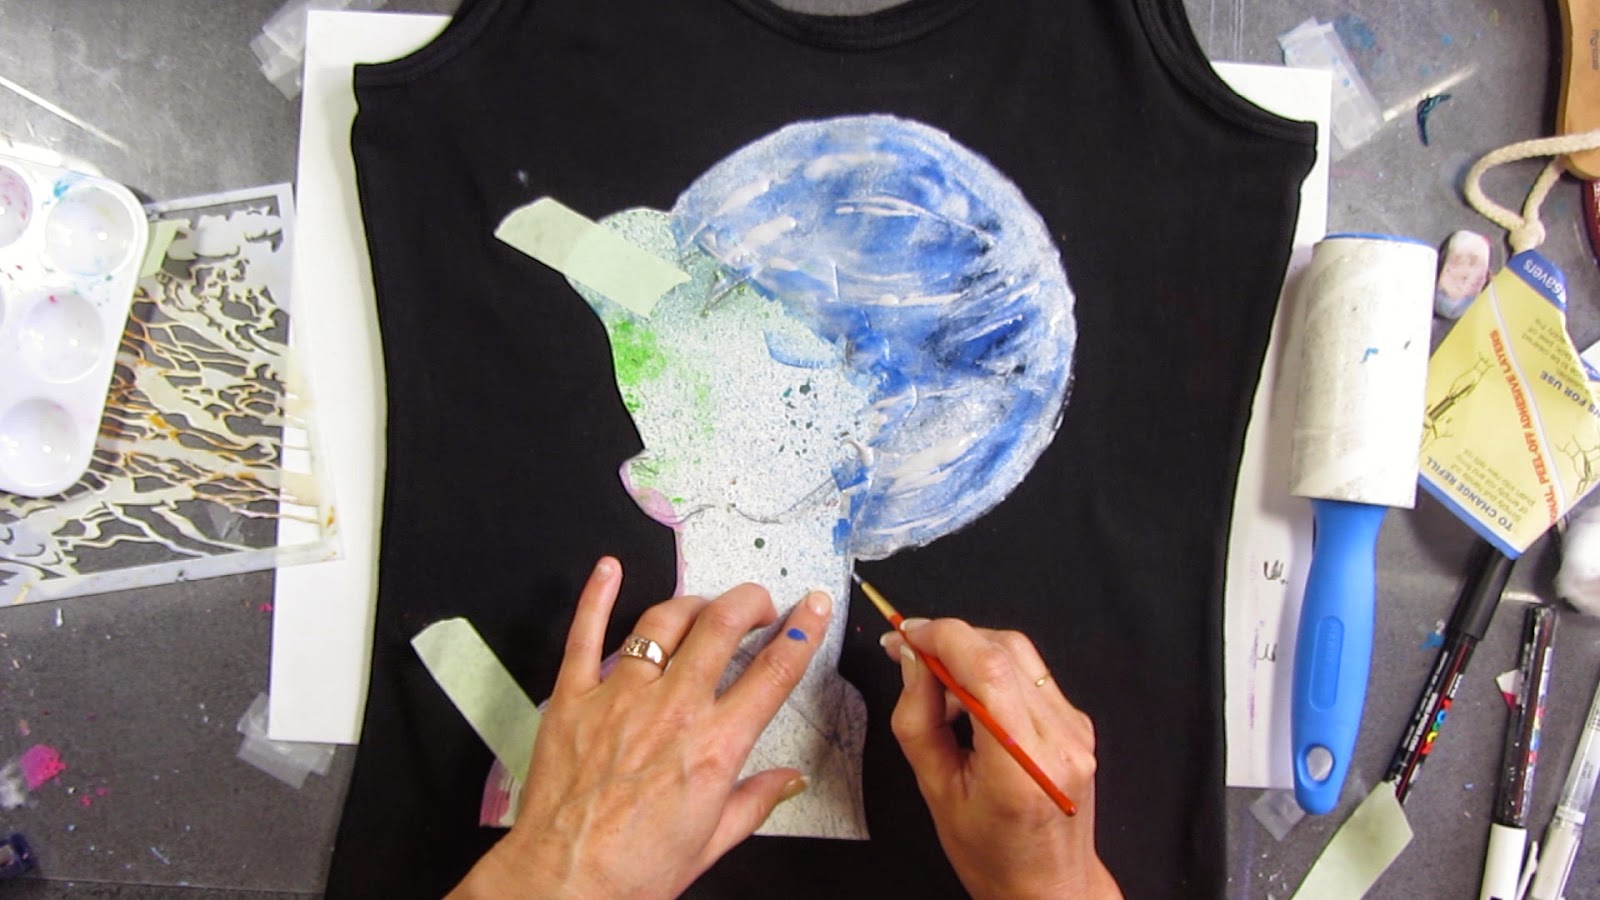
  • Then place your moon gazer mask and your circle stencil on your top as shown, securing in place with some removable tape.

    • Prepare your paint by mixing about 3 parts Pebeo Setacolor Opaque Silver Shimmer, with 1 part Pebeo Setacolor Thickener. I did this to make the paint thick to lesson the chance of the paint seeping under my mask/stencil


    • Carefully paint inside you moon stencil. Paint in the direction starting outside the stencil moving inwards.
    Add your blue paint
    • Begin to randomly mix in Pebeo Setacolor in Cornflower. You can also leave a little black showing for extra colour variation.

    • Use a thin Princeton brush to add curved silver lines to help give the impression of a sphere and also add texture.

    • Remove moon stencil carefully, and trace around the edge of the moon gazer mask using a fine brush


    • Touch up any edges with a fine brush


    • I used a wider brush to paint in the hair, adding some silver and some blue paint.


    Add blue to the hair

    add the stars (optional)


    Here I am using the SetaSkrib marker in Black to go over where my silver paint when wonky and neaten up my lines.

    She's done. Don't forget to iron your top for 5 minutes as per instructions on the bottle to set the paint.

    Thursday, 12 March 2015

    Cool Customised Calico Shopping Tote


    Believe it or not this is my first "play" with Pebeo Setacolor Fabric Paints. This just goes to show how easy it is to create something cool and customised.  Here's how I did it...

    • Grab a piece of calico or other firmly woven cotton fabric, wash it first to remove sizing (in detergent without fabric softener) and iron.
    • I started with this stencil that I already had in my art supplies (sorry that it's old I can't tell you where I bought it or what it's called but you would be able to find something similar in your craft store).
    I taped the stencil down with some removable masking tape to help keep it in place.

    • Next I mixed Pebeo Setacolor Opaque in Black with Pebeo Setacolor Thickener. This is to make the paint a very thick consistency so it doesn't spread on the fabric when applied or seep under the stencil. I experimented with just adding a small amount of thickener at a time and stirring until I was happy with the consistency.
    • Use a stencil brush (mine are from Princeton) to dab on the stencil. Try to keep the brush vertical and dab in an up and down manner rather than brush. This will help stop your stencil from moving and give you a cleaner finish.
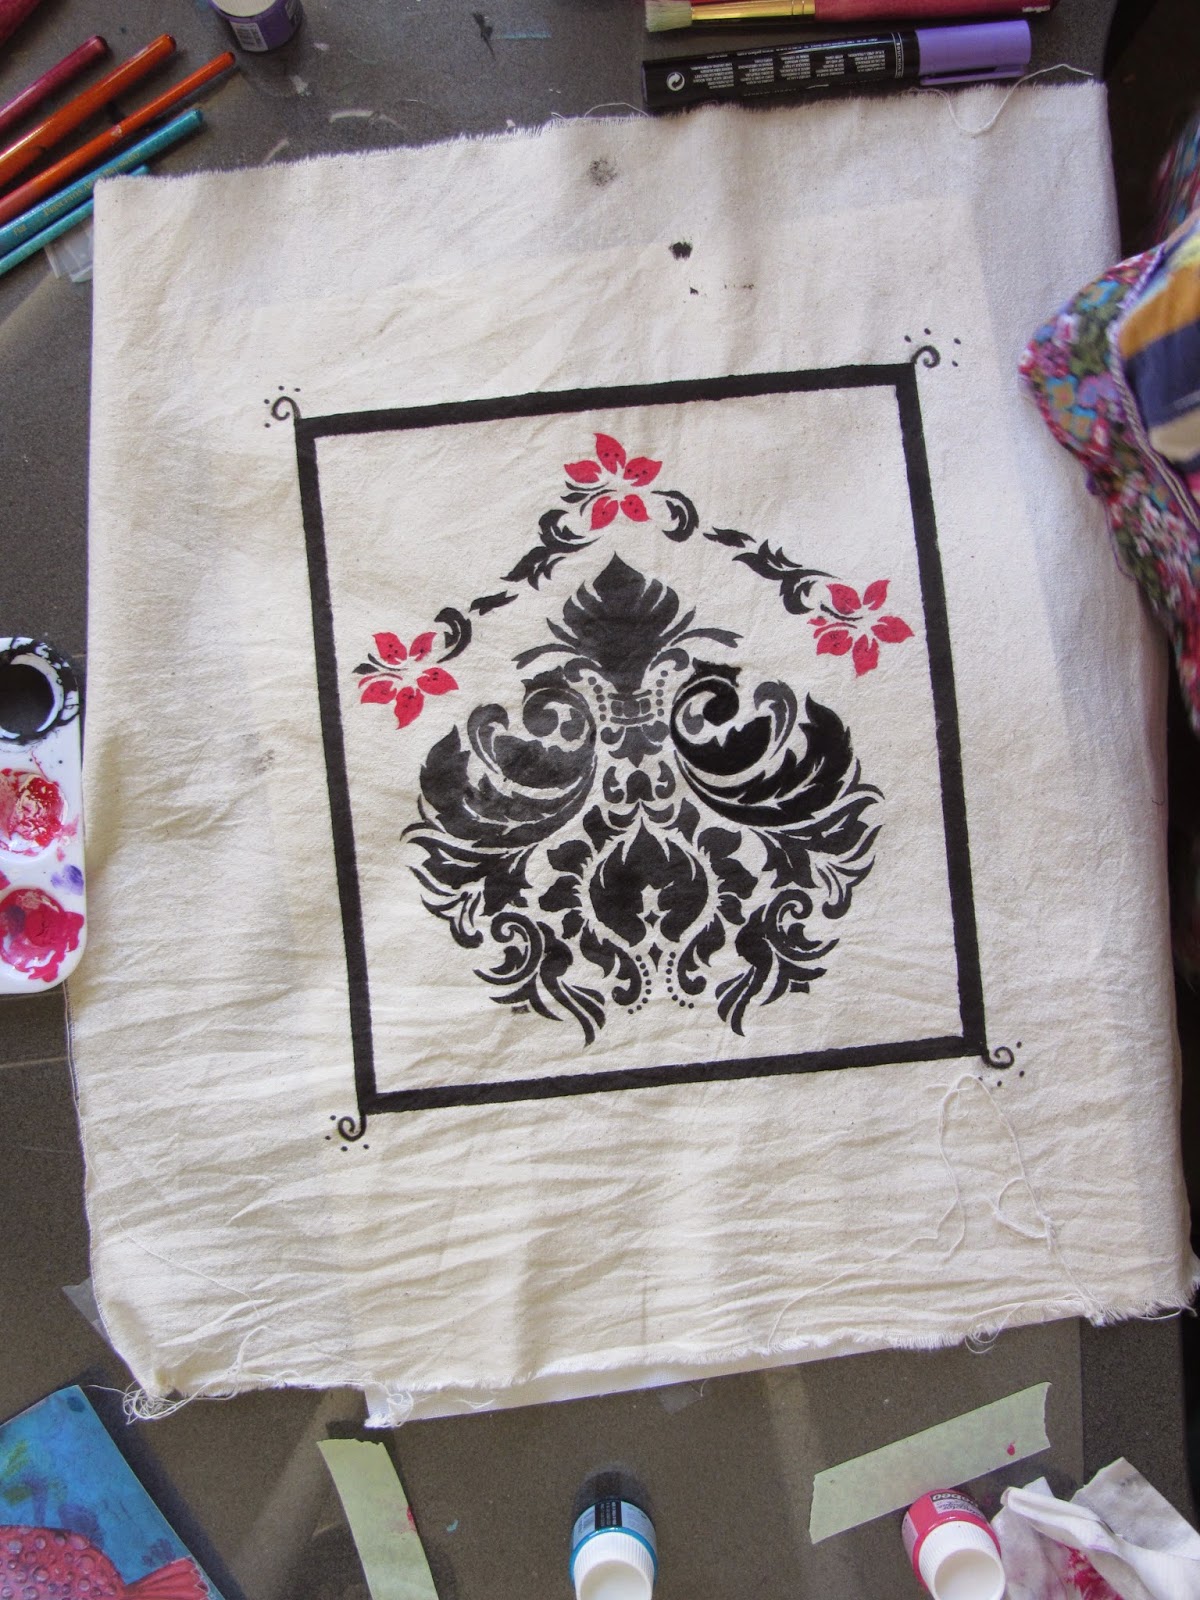
    • I did mine all in one colour to keep it simple, except for three small flowers within the design that I painted in Pebeo Setacolour Opaque in Cherry Red. You may need to use a smaller stencil brush or other fine brush to get details depending on your choice of stencil.

    • To create the border I placed strips of Scotch tape about 1cm away from the straight edges of the stencil and painted inbetween, carefully removing tape and being careful not to move the stencil.

    Ok, at this point I want to tell you are few things NOT TO DO, and how you might be able to fix it if you do do it...
    • DO NOT accidentally drop your paint brush on your fabric: You can see a black dot at the top of the fabric where I did this. I decided to cut right around the edge of my border and appliqué the picture onto another piece of fabric.
    • DO NOT smudge the edge when lifting the tape: I did little designs in the corners to try and mask this, then since I cut right around the edge this problem was also eliminated.
    • Make sure your paint has dried evenly before you lift the stencil: I think this was caused because I ran out of black paint and had to mix another batch, the second patch was thicker than the first. It was easily fixed by using a Black Pebeo SetaSkrib marker to carefully go over the black painted area. This also allowed me to fix any small stencilling errors, and better define the design. 
    • HOW A MISTAKE CAN SOMETIMES GIVE YOU A COOL UNEXPECTED DESIGN FEATURE: I purposely left some the lighter Black areas light, this gave my design a two-toned black effect which I really liked.
    • I also added a little red SetaSkrib marker to the outside of my flowers for depth and added a few black dots with the Black marker.


    One I got to this stage I began to see that I could actually turn my "play" into something useful.  
    • I decided this could be a great design for a simple Calico shopping tote, so I cut a piece of calico to size (mine is 30cm X 45cm finished size but it doesn't need to be exact)
    • I used an double-sided iron-on adhesive web, "Heat n Bond Ultrahold" but there are plenty of different types available. Follow the instruction for your particular product, but basically you peel of one side, iron it onto your design, cut around the shape of your design, then peel of the backing and iron it onto the other piece of fabric.
    • I stitched on a piece of trim that I had in my sewing box to the bottom edge of the bag, this is optional, or you could use any trim that looked nice with the colours and design of your stencil
    Once you have decided where to place the trim, pin it onto your fabric while it can still be laid out flat, and secure your trim BEFORE stitching up side seams

    • To make simple straps cut two long strips of fabric (mine were 5cm wide and 65 cm long) Fold the fabric in half vertically and press. Leaving a seam of about .5cm stitch down the raw edges to make a tube. Use a Loop turning tool to turn your straps inside out and iron to press them flat.
    • Next cut two strips of fabric the same width as your bag and about 5cm wide. This is to be a facing for the top of the bag so you can attach your straps. Finish the bottom edge your facing with a zig-zag stick, overlocker or other finishing method.
    Stich in your straps before sewing up the side seams
    •  Layer the top edge of your bag (right side up), place the strap its desired position (mine were about 6m from each edge), and the facing (wrong side up) and stitch through all layers. Repeat with both the front and back side of your bag) 
    • Turn the facing to wrong side, edge stitch on top of the facing, at the edge of the seam, through the seam thickness.
    Edge stitched will help the facing lay neat and flat

    • Sew up your side seams, finish the edges, then turn your facing in and press.

    And there you go, one variation of a simple tote bag that you can make with basic sewing skills and Pebeo Setacolour Fabric Paints.  The possibilities for what you can create are endless.