Showing posts with label Yellow. Show all posts

Saturday, 21 March 2015

Easter Placemats!

Rabbit Placemats

By Natalie Wyatt 


 Made with "Pebeo Setacolour Paints"

Hello beautiful blog watchers!

I have for you today a very easy and repeatable Easter idea to liven up some place-mats or make some especially for the occasion. :)


 What you will need:

  • Stencil Print Out
  • "Inhabit" by Ladelle - Place-mat and Napkin Set (Yellow)
  • Pebeo Setacolour Paints
    • White
    • Rose Bengale
  • Scissors
  • Canson Coloured Card (White)
  • Water
  • Paintbrush (Princeton)
  • Graphite Pencil
  • Tissues
  • Paint Roller
All of the above items can be sourced from Spotlight Stores.

Black is optional if you would like to add eyes.


Here is the stencil for you to print out.

My version was roughly 12.5 cm tall from the lowest point to the highest.


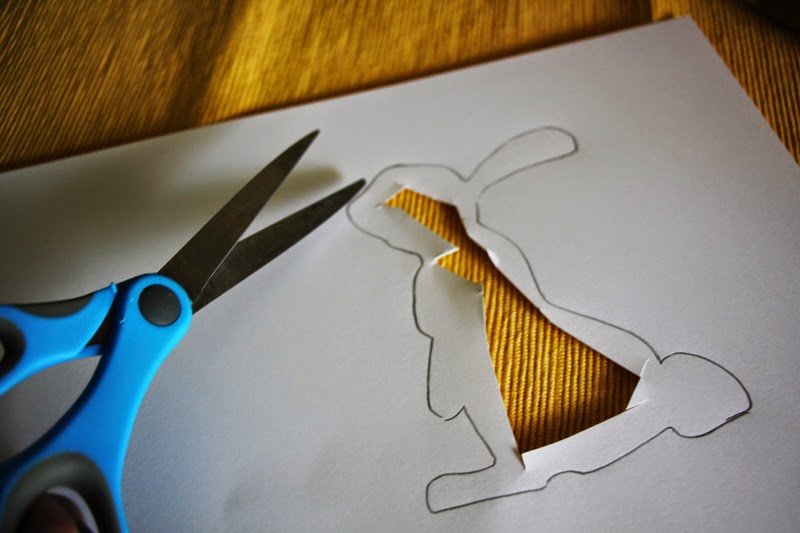
First of all, you will need to cut out the black Rabbit Stencil.


Try to be as precise as possible for the best shape.


Take a piece of white Canson coloured card.


Outline the stencil on the card.


Start cutting the stencil from the middle, we want to have a complete piece of paper around the edges.
You will need to make a hole with a sharp object in the middle to allow the scissors to break through.
I used an etching point to break a hole.

For those who are more experienced, you can use a Stanley knife and cutting board.


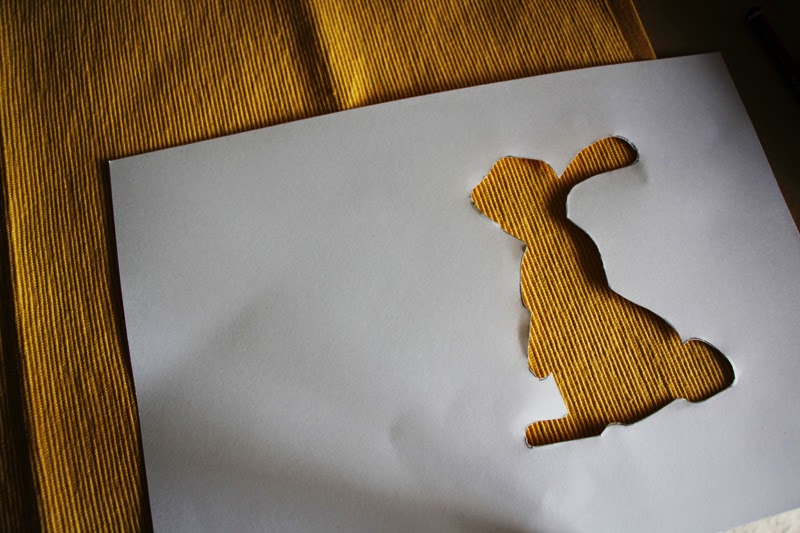
Cut out a chunk from the middle so it's easier to cut the edges.


You should now have a complete stencil!
I cut my Rabbit with space around the edges so I could use my roller without getting paint rolling off the paper.


Position the stencil on your place-mat.


Using the Princeton brush, start applying the paint to the roller.


Cover as much of the roller as possible.


Start rolling over your image.


You may have to roll both up and across to completely cover the place-mat.


Remove the stencil carefully.


You may want to touch up any areas you missed with the brush.
You can use all sorts of colour and mix them to create gradients. As you can see above, a tinge of blue creates a purple depth on the right-hand side.


Using a smaller Princeton brush, apply the white paint.


You can do this step while the paint is a little wet to create the pink tinge, or wait until it's completely dry to achieve the strong white colour.


Fill in the small space on the tail.


Paint the ear.


Now the whiskers.


And finally the nose!


Now you are ready to iron. 


 Make sure you leave a day for the paint to fully dry before ironing. 


I used an ironing cloth over the paint the first few times and the finished it off with just the iron.


Iron the place-mat on a medium setting and iron both the back and front.

You are now ready to use your place-mat!

Hand washing or Eco-setting washing is the best way to clean the mats.


I repeated the series very easily as well. You can always add grass or any other fanciful additions!


Setting suggestion below.


Please send us your work or anything that you create! Thanks for watching!
 
Natalie Wyatt
Natalie's Facebook Page: https://www.facebook.com/nataliebethart?pnref=lhc

Sunday, 15 March 2015

My plates bring all the 'Chicks' to the yard!

Chick out this Easter Plate
By Natalie Wyatt 

 Made with "Pebeo Porcelaine 150 Markers"
Hello all you wonderful people!
It's getting closer to Easter and things are well under way for the upcoming season. I made this really easy plate for you all to create to decorate your table or liven up any crockery or serving plates.
Have a safe and happy Easter!


What you will need:

  • Stencil Print Out
  • Jose's Cantina Mexican Side Plates (Yellow)
  • Pebeo Porcelaine Markers
    • Anthracite Black
    • Peacock Blue
    • Agate Orange
    • Peridot Green
    • Marseille Yellow
    • Scarlet Red
    • Lapis Blue
  • Scissors and Tape
  • 4B Pencil.
  • Pen
  • Tissues
All of the above items can be sourced from Spotlight Stores.


Print out your stencil, it should be 21cm wide, you can set up these parameters in a word document. Just paste in the above image, change the "Wrap Text" to "In Front of Text" and then change the width to 21cm.


Start by cutting the stencil into two pieces: the chicken and the egg.
Make sure you leave some overhang on your pieces so you can stick them down.


At this point you can ponder philosophical questions like which came first, the chicken or the egg?


Flip your images over.


Using your sharp pencil, shade heavily on the back of the images.


You'll want to shade as dark as possible without ripping through the paper.


Make sure you have washed your plate in hot soppy water to remove oils from the plate otherwise your outline won't stick to the plate.


Position your images however you'd like and stick them down with tape.


Now, using your pen, trace the lines of your image. Once again, do it with enough pressure as to not rip the paper because you will scratch the plate.


Repeat the tracing on the eggs.


Once outlined, you can peel the stencil off your plate.
Sometimes I'll lift up one corner to make sure I haven't missed any sections of the drawing in my tracing.


Some areas may appear stronger than others.


 If that is the case you can take your pencil and draw back in the light lines.


'Chick' it out!


These are the example of markers that I used for my tutorial, however you can use any other variations of colour that you already possess or are available.


This is an example of the colour scheme that I used.


To start using the markers you will need to shake them well and then press the tip repeatedly against a scrap piece of paper until the nib fills with paint.


Outline the plate with the Anthracite Black.

You may find that the paint starts to fade after a while during the drawing process, however you can simply press the nib again a couple of times to flood it with paint.

The faster you draw the line, the thinner it will be.


Now, using your Agate orange, draw in the legs.


 Make sure you have allowed the paint to dry before proceeding otherwise you will lift up the paint you've already put down.


Repeat with the beak.


Take the Scarlet Red marker and begin filling in the Easter Egg. 


Continue.


Lapis Blue.


Peridot Green.


Agate Orange.


Peacock Blue.


Marseille Yellow.


 Allow 24 hours to dry and then bake in a normal oven on 150 degrees for 35 minutes. Once it has been baked, turn off the oven, leaving the plates inside and allow to cool gradually before removing.

You are now ready to use your creation.


Please send us your work or anything that you create! Thanks for watching!
 
Natalie Wyatt
Natalie's Facebook Page: https://www.facebook.com/nataliebethart?pnref=lhc