Saturday, 18 April 2015

Painted Suitcase ~ Setacolour & SetaSkrib with Michelle

Have you ever got to the airport and can't find your suitcase in a hurry? Well these Pebeo Setacolour and SetaSkrib Fabric Paints are a perfect solution to personalize your luggage.
You don't have to just paint a picture, simple splats, or using stencils or you can create zentangle patterns, you are only limited by your imagination.


Start with any Suitcase.


Pencil your design onto the luggage.  If you are painting onto a black suitcase you might want to use a white pencil to draw your design.

To make a skin colour I have combined pink, white and a little yellow of the setacolours.
I add a little to my hand as a skin colour reference.


Paint the first layer over the face, then I added a little black to the skin colour to add some shadows.


After some shading colour in the eyes with white and the lips with pink.


Allow to dry (I ironed it at this step) Then take the SetaSkrib to colour in the iris's.

Take the Black SetaSkrib to colour in the pupil and to line along the eyelash line.


I used some pencils to add a little more detail and shading.

I used a lighter colour to outline the hair.


Then Painted the hair first in black then added brown over the top.


Add some white to create some highlights and also to paint a crown. I created the crown to include the silver pieces on the luggage.

Use a Pipette to add some splatters over the front of the suitcase. I covered the face for this step.


Add some more detail to the face and lashes, I used a mix of the Setacolours, SetaSkrib's and pencils.


I hope you enjoy this project, if you decorate your luggage we would love to see them over at the Crafty Crusaders Blog:)


Friday, 17 April 2015

Pebeo Glass Painting with Siann Watts


My sweet little Water Pot I use to wash my brushes was my favorite but it was plain,
And Now its not only my favorite,
its the cutest thing on my desk.


Check out How to Paint on Glass With Pebeo Glass Paints by Siann Watts on Snapguide.

Thursday, 16 April 2015

Gelli Printing with Pebeo Paints and Catalyst Tools

Gelli Printing with Pebeo paints and Catalyst tools

Hello, it's Peta here again to show you how to create some unique and original prints on paper (but you can also print on fabric) using a gelli plate and some pebeo paints. I've also used some stencils and some household items to make marks on my prints. 


Check out How to Gelli Print With Pebeo Paints by Crafty Crusaders on Snapguide.


Have lots of fun with this process and I can tell you that the pebeo paints work really well with the printing plate and I could get about 3 prints from each application which is really economical. 


Wednesday, 15 April 2015

An afternoon of Art Decodance


                                       FAUX-NAMEL 

                                             With Pebeo Vitrea160


Want the look of enamel jewellery but without the fuss. Here's a little secret. Get the same look with Pebeo Vitrea160 Brilliant Glass paints. Here's a little bracelet I whipped up in the Art-Deco style.So easy and very eye-catching. Let me show you just how simple it can be. 

SUPPLIES: Pebeo Vitrea160 Glass Paints in Oriental green, Sun Yellow, Turquoise, Pimento Red and Anise. 
Jewellery supplies:  spacer beads, clasp, headpins, jump rings and your focal beads. Pliers and wire cutters .
Paint brushes, fine tip and flat, rubbing alcohol, cotton buds or clean cloth and wooden scewers.


Let's get started. …..
             
Stand your painted beads aside to dry.
 Give a second coat if neccessary.

                                                           
With your colours, begin by painting a layer onto
your spacer beads with a flat brush.
Using the skewers so as to make the painting
and drying of the beads easier.


Move onto your focal beads.
The more delicate the pattern ,the more colours you
can add for effect.
Fil in the spaces with your fine tip brush and be sure to
wipe off any messy edges or 'spill' with a cotton tip or cloth and a little rubbing alcohol.
Once allowed the recommended 24hrs drying time,
the beads can be baked as per instructions.
After that, it's just a matter of deciding which coloured
 spacer beads go where and you're ready to assemble.


Now you have you're very own faux-neamel piece to show off.
I hope you enjoyed this project  and are tempted to give it a try. It really is that easy.

Till next time
Ciao
xox
KERRY SINIGAGLIA

Sunday, 12 April 2015

Paint Your Own Tank Top With Pebeo Setacolor Fabric Paint


Here's what you will need to paint this Tank Top:
  • Black Tank Top (or T Shirt if your prefer). Mine is 95% cotton, 5% elastane. Look for a smooth rather than a ribbed fabric.
  • Pebeo Setacolor Opaque fabric paint in "Shimmer Silver"
  • Pebeo Setacolor Thickener
  • Pebeo Setacolor Opaque fabric paint in "Cornflower"
  • Pebeo SetaSkrib Markers in Blue and Black
  • Paint brushes, one flat, one small round, I used Princeton brushes.
  • Heavy paper to place inside your Tank Top so paint doesn't run through to back
  • Removable tape to secure your masks to your Tank Top
  • Lint Roller (or other tool to remove lint)
To make a moon stencil:
  • A4 size craft foam sheet (Or even heavy cardboard would be ok)
  • Plate or circle template
  • Craft knife and mat
To make Moon Gazer mask:
  • Print up template provided (computer and printer required)
  • Piece of heavy paper (185 - 300 gsm would be OK)
  • Heavy Gloss Gel
  • Old paint brush for Gel
  • Scissors
Here's what to do:
  • Firstly wash your top in a detergent that does not contain fabric softeners.

Make a circle stencil for your moon.
  • To make your moon stencil, you need to cut out a circle shape. I used a thin piece of craft foam, and a bread n butter plate. Place on a cutting mat, and cut around the plate with your craft knife. Keep both the stencil and the mask (the solid circle shape) as it might come in handy for another project
  • To make the Moon Gazer Mask, print up the template below.


  • Cut around the template and then draw around the edge of the template onto a piece of heavy paper. Cut the shape out and coat front and back with a couple of coats of heavy gloss gel (allowing to dry in-between coats and before turning over). This will make your mask strong and durable and resistant to damage from paint and other liquids. I've used my mask in many projects like the paintings below,  and its still standing up well.

  • Next take some heavy paper (I used old card stock) and insert inside your top between the front and the back, you don't want any paint to seep through onto the back of your top.
  • Use your Lint Roller to remove any lint/fluff from your top
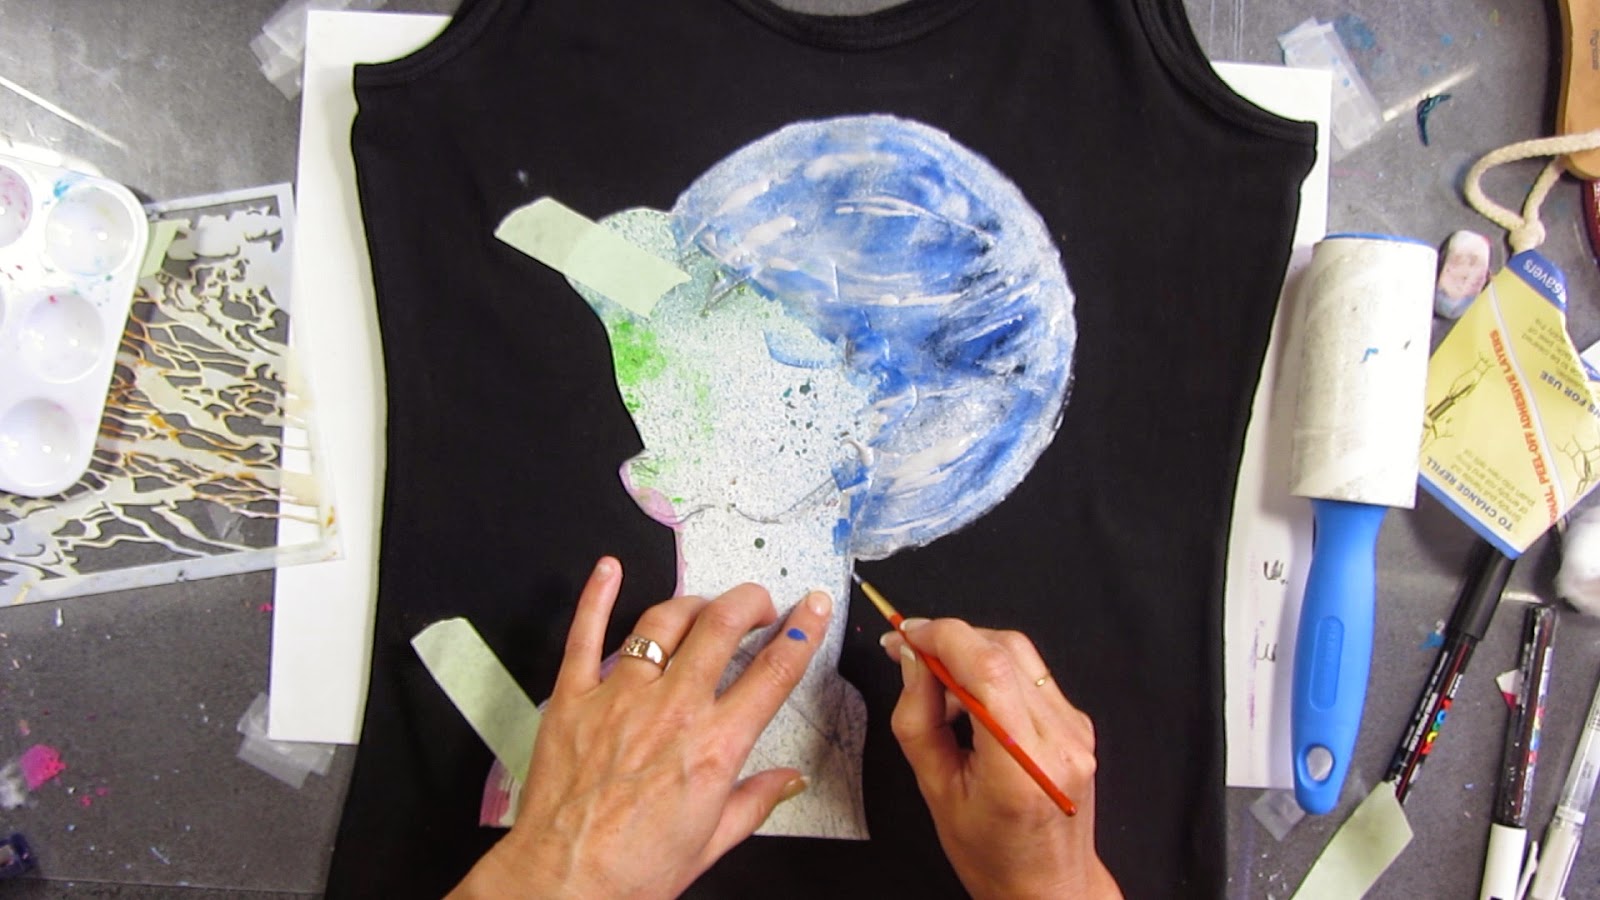
  • Then place your moon gazer mask and your circle stencil on your top as shown, securing in place with some removable tape.

    • Prepare your paint by mixing about 3 parts Pebeo Setacolor Opaque Silver Shimmer, with 1 part Pebeo Setacolor Thickener. I did this to make the paint thick to lesson the chance of the paint seeping under my mask/stencil


    • Carefully paint inside you moon stencil. Paint in the direction starting outside the stencil moving inwards.
    Add your blue paint
    • Begin to randomly mix in Pebeo Setacolor in Cornflower. You can also leave a little black showing for extra colour variation.

    • Use a thin Princeton brush to add curved silver lines to help give the impression of a sphere and also add texture.

    • Remove moon stencil carefully, and trace around the edge of the moon gazer mask using a fine brush


    • Touch up any edges with a fine brush


    • I used a wider brush to paint in the hair, adding some silver and some blue paint.


    Add blue to the hair

    add the stars (optional)


    Here I am using the SetaSkrib marker in Black to go over where my silver paint when wonky and neaten up my lines.

    She's done. Don't forget to iron your top for 5 minutes as per instructions on the bottle to set the paint.

    Friday, 10 April 2015

    Cute little Tomato dish using Pebeo Porcelain Markers

    My most favourite dinner is antipasto or cheese, crackers dip and olives (maybe a glass or two of red), so I always have some cute little dishes around to put in some of the various bits and pieces in a snuggle down with my boys (luckily they also love this dinner - skipping the wine of course ;).


    This little dish was inspired by one of my artworks which has these gorgeous red juicy tomatoes. I really wanted this to be a quick and easy one and I love using markers, so the Pebeo Porcelaine Markers were the obvious choice.

    Firstly i started by marking out the outline (bottom left pic). The thing i really like about these if your not confident in your drawing skills you don't need to be worried as any marks you make can be wiped off really easily. I used a cotton bud to erase lines I no longer needed and then just marked them out again with the red marker! Super quick and easy.

    Next I  marked out the stem and the lighter area of the tomatoes with the orange marker. I knew that I was going to leave the hightlight from the tomatoes white (ie. i wasn't going to use a white paint over the top) so I just matched from my reference drawing where this was going to go.
    Next I filled in the areas of the tomatoe with a combination of red and brown markers. I made sure I worked quickly in this area to blend the two colours together so they kinda blurred. I used "short strokes" and cross hatching with the various marker colours all the way around until I got the depth that I was looking for in the shape of the tomatoe.

    I noted that if you go over an area whilst its almost dry it will scratch off, so I thought it best to wait until the whole thing with dry before I added any more layers. So whilst this bit was drying I went around the top of the bowl with a cute little pattern of just a line and a dot (because if there are things in the dish all you would be able to see is the edge anyway so its good to make this a bit cute! :)

    I then dabbed the nib a bit to expel excess paint and then blended that around the areas of the tomatoe where I wanted it to be really quite dark. I guess the lesson to be learnt here is that you can just keep going with these for a bit as long as you go easy and have a bit of drying time in between.

    Once this was totally dry I then added a few final touches here and there, and presto, a super cute quick little dish just asking for some dip to put into ready for my next night in.

    Hope you enjoyed it, Cheers!

    Wednesday, 8 April 2015

    Crafty Crusaders Guest Designer Geri McLeod

    Meet Geri McLeod


    An interview with Geri!

    "Tell us a bit about yourself ......
    Hi everyone. I live in Brisbane with my little family of three kids Tom 20, Anna 16 and Cate 12. We have a dog called Honey who is the light of our lives. 
    I have worked in different jobs such as teaching little kids how to speak English, admin in a family law firm and other admin jobs. Being a sole parent I need to be the breadwinner but any spare time I have is devoted to art.
    My son Tom has a syndrome and I am his carer. Recently I have had to take time out of work to care for him. I discovered to my happiness that I can do art on hospital floors, hospital emergency wards, and also I can fall asleep just about any place as well.
    I am happy living in Brisbane mainly as it is a short drive to incredible beaches. I often head up to the Sunshine Coast and the dog and I enjoy a good swim in the waves. One day I am going to live above the sea and I hope to do art every day and grow lavender.

    What is your art history.....When/how did you become an artist?
    My favorite thing at high school was art and I remember it was all I thought about. I did 
    fine arts at uni as part of an arts degree. I got busy with working a day job and having kids and I did tinker in ceramics and stained glass and other creative things but it wasn't until my beautiful husband was in Palliative care that I rediscovered art. The ward had a little art group that met every day in the foyer and you could just turn up and paint. I stumbled across it one day and decided to have a go. I found art so great to bring peace and to have a mental break. I then started doing art on weekends and found a couple of hours was like a having a weeks holiday and gave me the rest I needed from life. It was really doing a weekend retreat with Jane Davenport at her Nest that I really got excited about art. I then joined up her classes and I have had a wild time. I even went to Paris with her last year. I had never been to Europe and it was the best thing I have ever done. 

    Where do you create?
    My favorite place to create is the dining room table for some reason. Maybe because it has the air conditioner. I have an area I call my art studio with my computer and supplies all set out up the end of my bedroom. I find I have to move around as this refreshes me. I guess its a bit nomadic. I move to a spot like the sofa and slowly pens and things appear around me. I have an art attack and then pack up and move back to my studio. I love also creating out and about. Especially in a coffee shop or my car whilst waiting for kids to do guitar lessons as it's under a tree full of lorikeets. When I go on holidays I take more art supplies than clothes in my bag. There's so much inspiration around you on holidays 
    ithink its a great time to get creating.

    What is your most favorite media to use?
    My current favorite media is pens. I love them and especially alcohol markers. Paint pens are awesome too. I am mixed media to the core and rely on whatever my eye lands on as the right thing to use. I think if I have to search for something it is a sign its not the right tool. Often I think blue and then look and see the pen or paint or whatever and straight away know that its the right one. 
    I love the smell and feel of good paper. And also how many beautiful art supplies there are these days. When I was at school we had horrid paint and horrid paint brushes and very ordinary paper. These days the best part of art is that you get to touch beautiful paper and then the colors and textures around you are so divine that it makes your heart sing.

    What kind of art do you love to create?
    I love using colour in my art. It is the greatest pleasure to see how one colour bounces off another and how everything can change in a second by adding one little dot. 
    I love working in a journal and often have four or five journals on the go at once. I do love a big canvas as well but am just starting to delve into that. Acrylic paint is a wonderland and I am also loving watercolour as well. 
    I love abstract flowers and also love faces and lovely mermaids and fairy creatures. I love the idea of things slightly wild and imaginary. My muse has been Jane Davenport in learning how to draw things. I am still doing her courses and also others such as Flora Bowley and Mindy Lacefield.

    When do you find you are most creative?  (when do you find you create)
    I create best when I get straight out of bed and sit down and just start doing something. I am not thinking much and its a great way to start to the day. 

    What inspires your art?
    Often I write things and then gesso over it. I try to create something beautiful to bring a bit of happiness into the world. I am inspired by the healing properties of art. I love the feelings that art can communicate and that people can look at art and feel something.

    What do you do when you find you feel creatively blocked?
    I usually get up and go do something else when I get the feeling things are going off. I have days off and know its good and try not to pressure things. I usually find if I just do something like a background or add a bit to an old journal page that I get into art and for me it is such a pleasure I find it hard to stop.

    How do you fit art into your everyday life?  (do you have to juggle things, or do you fit it in first, and juggle everything else?)
    My problem is I would like to do art 24 hours a day. My idea for 2015 is not to do any one thing for too long. So a bit of art, a bit of cleaning, a bit of cooking, a bit of being a nice mother, a bit of playing with the dog, and then things seem to be in balance. It's also good to keep moving. I find if I spend too long sitting and trying too hard and taking myself too seriously it is not as productive. I think everyone works differently. And I admit if I get into an art flow I find it very hard to stop as its the best feeling in the world."

    Lovely to *meet you Geri.  Thanks so much for sharing!


    See the Awesomeness Geri has to share with us today......


    Ok I can say that art has saved me and helped me get through some challenging times. It's a valuable tool as I know whatever comes up I can go to my paints and I will feel better and work through things.
    Drawing and painting really works for me and I can forget all my worries and escape into a turquoise or fuschia dreamland. I am fascinated by how clearly art can communicate a feeling, a message. I guess thats why I keep going. Art helps me work through feelings I cannot put into words easily.
    Also, if I have made someone else feel something by looking at my art then that is a wonderful bonus. If I can use a colour that makes someone happy then I feel great. 

    I do a lot of Jane Davenport's classes and she has taught me so much. It's always valuable to learn more and keep discovering. I don't think there's ever been a better time to be an artist than right now with the quality of art supplies and the range of exciting new things. 
    Mixed media allows an open door to a whole world of exciting supplies. Recently I discovered watercolour as my favourite thing. I know it's been around forever but the range of colours and using it with mixed media make it my absolute favourite. It is also easy to carry around, and is non toxic.
    If you love watercolour then you will love Schmincke. It's worth getting a few tubes of Schmincke's exquisite colour and enjoying it.  I think the Cobalt Turquoise is the most beautiful colour imaginable. I can hear mermaids singing and see tropical island paradises waiting for me. As a watercolour, it floats and ripples as it paints and it makes me happy.
    It's a little bit of mermaid heaven. 

    I often like to sketch and look for little bits of time in the day. I take paper and a few pencils with me most days. I just draw what comes out. I'm loving the Canson Montval Aquarelle paper, and the Canson bleed proof paper. I have been using a Canson Ivory 111 pastel paper for sketching and watercolour as well as pastel and it is superb.


    It's worth trying out different ideas and new art supplies and if  something works it might become a firm favourite.
    I use colour pencil, alcohol markers, sharpies, watercolours and ink in water brushes and add some collage too if it calls to me. You can have a little set of your favourite things in a tote bag and take that with you whenever you like. It's good to get used to sketching on the run, in waiting rooms, outside kids music lessons. Don't worry about other people staring at you. They really don't care and are happy to see someone doing art. Just get used to pulling out your paper and a pencil whenever you can. Also allow yourself to get the best quality art supplies you can. Even if you can only buy one tube of watercolour at a time it is worth it. Yes Schmincke is totally beautiful and I will be adding to my collection one tube at a time.


    Mepxy markers are great for skin tones and blend really well. It can take a few goes to get comfortable with watching the blending process and you need to use good paper like the Canson Bleedproof paper that is especially made for alcohol markers. 
    In the mermaid I have used Mepxy for her skin. The Mepxy range of colours are amazing. I love Orchid Ice and the gorgeous pinks. They are my favourite brand of markers and a very valuable tool to have in your art supplies. You can add life to your sketches with some Mepxy here and there. And then watercolour can add the babababoom!!
    With the different marker tips I really love the brush tip as they are soft and it feels like you are painting with them. Coloured pencils go really well over the watercolour and Mepxy markers so you can add in small detail and more colours. It is also really nice to draw over dried watercolour. It feels lovely and line can add movement and soul.


    Bye for now.
    I'll be back with some more Schminke happy news. I can't wait to use a set of half pans i have ordered from Jane Davenport's store. They are totally scrumptious colours!! Happy days.
    Geri


    Bye for now. May the Schmincke's be with you!!!!!

    Geri